 The European 2006 Spring Fashion collections were chock full of luscious gowns that oozed romance with touches of soft lace, chic trains and divine embellishments. Thus a new season of pretty fashions are heating up.
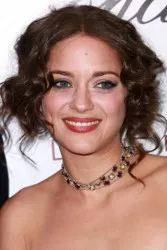
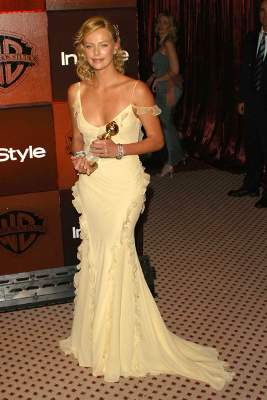 Shane did Charlize's makeup for the 2004 Golden Globes (shown to the side). He commended that "I wanted her to look like an old movie star, like Marilyn Monroe". To accomplish his goals he used false eyelashes and mascara.
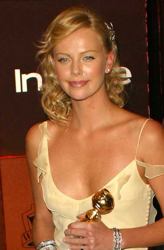 1. Begin by washing hair with shampoo designed for your type, texture and current condition of hair.
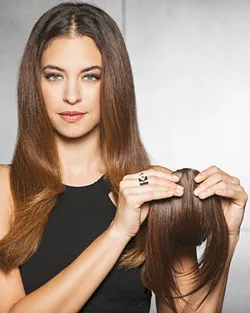


Wanna talk?
HairTalk® is the place for you!
Copyright 1997-2025, hairboutique.com, All Rights Reserved.

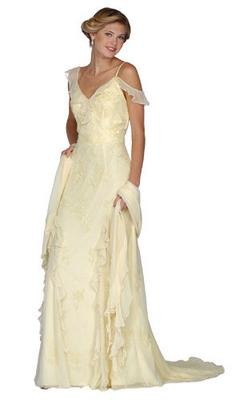
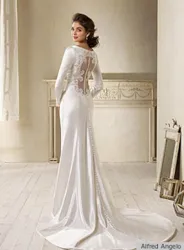
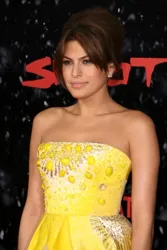
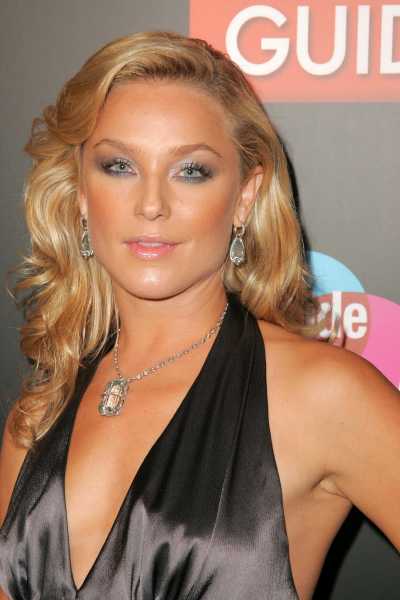
Introduction (Image of Prom Dress - SC1918 from the collection at Christina Gowns.com - all rights reserved). (Note: For more information on this stunning gown click on this link). A great example of this whimsical romance trend is the gorgeous silk gown with train shown to the side. This lovely creamy yellow confection was inspired by Charlize Theron's Golden Globes 2004 gown. This gown works beautifully with just about any type, texture or length of hair, especially when worn up in a soft twist or chignon in order to show off the gorgeous off-the-shoulder lacy straps. Steal Charlize's UpdoCharlize Theron always looks amazing. Not only does she work with some of the world's most amazing and extremely talented hairdressers, she has been working with celebrity makeup artist Shane Paish for over four years. Shane was quoted in Star Magazine in March of 2004 as saying that "Charlize is naturally beautiful - she's got great skin and stunning features. I always like glowy makeup for her and since we keep it simple and neutral for daytime, we often glam it up and go for old Hollywood beauty for nighttime".
(Image of Charlize Theron at 2004 Golden Globes Award - all rights - DailyCeleb.com) Charlize had her hair done by her long time celebrity hairdresser, Enzo Angileri. To copy her style complete the following steps. Starting Hair NotesThis style works best on hair that is shoulder length or just a tiny bit longer. Charlize wore her side parted strands in a side swept style with soft undulating waves. She wore one side pinned behind her ear and allowed the other side to cascade down around the top of her shoulders. This style is easiest to copy on hair that has natural texture or bend such as natural waves. If your hair is naturally curly, you would need to relax the natural curls into soft waves. If your hair is stick straight, you would need to create texture. Step By Step Instructions Select a super moisturizing shampoo formula like Robert Hallowell's Shine Booster Shampoo which celebrity hairdresser Robert actually uses on many of his celebrity clients. (Image of Charlize Theron at 2004 Golden Globes Award - all rights - DailyCeleb.com) Other formulas you might try include Phytojoba or one designed for colored hair like Phytocitrus. For ultra dry or super fragile strands, use the dry hair formulas and dilute the shampoo for extra gentleness. 2. For hair that is dry, damaged or chemically treated, follow the shampoo with a rinse-out conditioning treatment. Apply your favorite rinse-out conditioning product. Robert Hallowell's Prawduct - shine booster conditioner is an excellent rinse out conditioner for all hair types. 3. Be sure to match the product to your hair type, texture and condition. Work the conditioner into the driest parts of your hair. Leave on for up to five minutes. Rinse well. Finish with a cool to cold water rinse. 4. Towel blot hair (do not rub) and gently squeeze excess moisture. 5. Detangle hair and create desired front part. 6. Apply a cocktail of leave-in conditioner and anti-frizz products. For soft hold, apply a mousse. For extra hold apply a gel or gel/mousse product. 7. For straight or naturally wavy hair, use a soft round boar's head brush or similar natural bristle brush, work around the perimeter of your head and blow dry hair in two inch sections. For naturally curly hair, detangle and then blow dry with a long finger diffuser attachment. 8. When hair is 100% dry, use a medium barrel curling iron. Work around the entire head curling 2" individual sections with the iron. After you release each newly formed curl, carefully pin against the scalp. Continue this process until your entire head of hair has been curled and pinned in place. 9. Allow newly formed curls to completely cool. 10. Spray with a firm hold hairspray. 11. Carefully remove all of the pins. 12. Use fingers to carefully sweep one side of the hair back behind the ear. Pin with bobby pins the same color as your hair. Hide the pins so that they are not visible. If you prefer, cover the pins with a jeweled barrette or silk flower. 13. Use fingers or wide tooth hair pick to gently arrange the curls that cascade freely down towards the top of the shoulder. 14. Spray with loose hold hairspray. 15. For extra shimmer, apply one or two drops of shine serum to the palms of your hands and massage together. Lightly brush the palms of your hands over the top of your beautiful hair style. Optional StyleIf you prefer to wear your hair up like the model at the top of the page, complete Steps 1 through 6 above. 7. Use a paddle or flat boar's head brush or similar natural bristle brush. Working around the perimeter of your head, blow dry hair stick straight in two inch sections. For naturally curly hair, detangle and then blow dry with a long finger diffuser attachment. 8. When hair is 100% dry, use a medium barrel hot flat iron. Work around the entire head straightening 2" individual sections with the iron. Continue this process until your entire head of hair has been straightened. 9. Allow newly straightened hair to completely cool. 10. Spray with a firm hold hairspray. 11. Separate one strand of hair that is approximately 2-4 inches in thickness from the left side of the head extending from the front of the face. Clip that hair aside temporarily. 12. Gather all of the rest of the hair into a tight, smooth ponytail that comes to rest at the base of the head a few inches about the nape of the neck. Secure the pony with a Blax, bungee cord or other "hair friendly" elastics the same color as your hair. that is the same color as the hair. 13. Pick up a one inch section of hair for the underneath side of the back ponytail and wrap the strand up and around the base of the pony. This will cover the elastic or Blax base. Pin securely into place with bobby pins the same color as the hair. 14. Using your hands, carefully separate the ponytail into two equal sections that are separated in the middle. 15. Pick up the left section and using a comb, form a big barrel shaped loop. 16. Pin the newly formed loop securely against the underside against the scalp. Adjust the loops that it forms one half or a fan shaped chignon. Experiment with positioning the bun higher or lower or your head or twisting the hair tighter or looser. 17. Repeat Steps 14-16 on the opposite side of the head. 18. Use tiny hairpins that are 1/4 to 1/2 inches in the same color of your hair if you need a lot of pins to anchor. 19. Spray with firm hold hairspray 20. Finish the style by unclipping the loose hair at the hairline. Smooth the hair with fingers and then softly twist the strand to form a soft hair rope. Note: If the hair will not easily form a roll, use a curling iron to create a soft curve in order for the hair to easily form the desired soft roll. 21. Drape the new hair rope along the side of the face and merge the ends into the back of the chignon. Pin well. 22. Finished with firm hold hairspray and light brush of shine serum. Feel free to use tiny bobby pins to help anchor any loose hair. Or use a gel to smooth back any loose hairs from the crown or near the hairline in front. 23. Pin a jeweled clip or silk flower over the top of the bobby pins holding the hair roll in place. Note: If the hair will not easily form a roll, use a curling iron to create a soft curve in order for the hair to easily form the desired soft roll. Apply a light gel or setting lotion to hair that is fine, slippery or does not hold styles well. This will help to anchor the hair better. Remember to apply any gel or setting sprays before adding hair accessories. SummaryThe possibilities are endless if you take the time to play with different variations of this elegant bun style. The finished look is perfect for any special party, Prom, Wedding or other dressy hair event. |
| If you want to talk more about this or other hair care articles on HairBoutique.com or anywhere else, please post a message on HairBoutique.com's Hair Talk Forums.
|
Please follow us on Twitter at: https://Twitter.com/HairBoutique. I look forward to meeting new people from all walks of Twitter and learning from their Tweets.

