Prom Hairstyle: Updos #1
Introduction
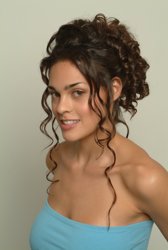
This ultra romantic updo modeled by Ebony (shown to the side) combines all the hottest dressy hair trends with carefully crafted curls, waves and sultry tendrils that whisper flirtateously around the nape of the neck and the face.
(Image of Ebony in "After" right pose - shown to the side) Creating a gorgeous cascade of sultry curls works best with hair textures that already have some natural wave or curl. Although hair that tends to be stick straight can also be fashioned into a curl infused style, it does take a lot more steps.
Getting Started Notes (Image of Ebony in "After" left pose - shown to the side) Short hair lengths might be transformed to this curly up style through hair extensions or the temporary use of clip-on tresses. Although Ebony's updo was designed without a fringe and a short center part to flatter her oval shaped face, a variety of parts and bangs could easily be incorporated into a customized version. The updo was created on previously-washed, dried hair that was "aged" so that the hair's natural oils had time to build up slightly. Natural hair oils help the updo hold tighter and last longer. Keep in mind that freshly washed hair may be overly soft and slippery, making it challenging to style. If you prefer to work with newly washed hair limit your use of conditioners or other products that make strands slippery soft.
(Image of Ebony in "After" back side pose - shown to the side) While this style might be accomplished at home with the help of some talented friends or family members, because the back involves intricate curls, when in doubt, ask your stylist to craft the style for you. If you do decide to do the style at home be sure to have several practice runs before the night of the big hair event. Instructions - Steps To Create1. 2. Starting on either side of the head, use a 3/4" traditional or ceramic barrel hot curling iron on 1-2" sections of hair. Work on one section of hair at a time. For extra hold, use a good setting gel like Phytofix or similar, to prepare each chunk of hair before curling with the iron. (Image with curling iron shown above & to the side) Note: While working on individual sections of hair keep the rest of the hair clipped and out of the way 3. Wrap each individual strand section tightly around the heated barrel to set the curl. Hold for 2 minutes or longer, depending on the thickness or texture of the hair. Keep in mind that thick or super straight strands may require a longer holding period. 4. Carefully release the newly formed curl from the iron. Use a spring type of bobby pin to anchor the new curl into place against the scalp. Spray the pinned curl with the appropriate setting product. Note: The key to this look is uniformity. Strive to make all the curls the same size and tightness. 5. Continue working on the next section of hair until all sections have been curled and pinned. 6. After the entire head has been curled and the curls have completely cooled, carefully remove all bobby pins and set the pins aside. 7. Lightly brush all of the hair with a boar's head paddle brush to arrange and smooth the new curls. 8. Use a smooth hairpick or long tail of a comb to form a vertical part that extends from the top of one ear to the other. After you have created the new part you should have two sections of hair, a front and a back section. 9. Using your hands, gather the back section of hair up into a tight ponytail that forms a 90-degree angle to the back of the head. (Image shown to the side). 10. Secure with a "hair friendly" Blax, Bungee or other elastic band, approximately 4-6" off the head that is preferably the same color as your hair. 11. Hold the ponytail where it is gathered by the elastic band with the thumb and forefinger of the right hand. Take the left hand and carefully loop or twist the entire "tail" section of the ponytail clockwise up and over the elastic band. In essence the original tail hair will form a full loop over the elastic band. 12. Securely pin the section with bobby pins the same color as the hair. Make sure that you pin only the loop section but leave the remaining ponytail hair loose. Note: After you have completely pinned the new hair loop you should still have a loose section of ponytail that will loosely cascade up and over the newly pinned looped section. The looped section should be completely concealed by the remaining hair. 13. 14. Secure each new curl with U shaped hairpins the same color as the hair. Hide the pins as much as possible in the folds of the hair and against the scalp. 15. Carefully arrange the curls around the back crown section of the head in a symmetrical semi-circle formation. Make sure that the curls are well balanced. 16. As a last step, use fingers or a long tailcomb to gently pull tendril pieces loose around the face and at the back of the neck. 17. Use the curling iron to curl the tendrils. 18. Lightly finger pick the tendrils to give them a wispier look. 19. Rub the serum into the palms and then lightly glide over the top of the style to add instant shimmer and shine. 20. Spray well with hairspray like Phytolaque or Jessica Simpson's favorite Phytolaque Soie made with real silk. Finishing Touches
Add instant bling to the chignon by pinning in a shimmering hair clips, chignon pins & couture jaws, decorative flowers or other hair jewels. Keep in mind that when this hairstyle is created according to the instructions, it is an elaborate style that might actually work best with a simple, but elegant gown, that would not compete for attention with the hairdo. The same is true for any hair or other accessories. This style exudes elegance and sophistication. While one stunning crystal encrusted hair jewel would look stellar tucked into the top of the updo's crown or along the side, more than one piece of bling may be too much. |
| If you want to talk more about this or other hair care articles on HairBoutique.com or anywhere else, please post a message on HairBoutique.com's Hair Talk Forums.
|
Social Media Network Information
Please follow us on Twitter at: https://Twitter.com/HairBoutique. I look forward to meeting new people from all walks of Twitter and learning from their Tweets.


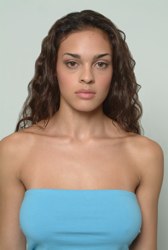 Gorgeous curls and undulating waves never really go out of style. Especially when used to design elegant updos or high fashion styles. Softly formed curls combined with long wispy tendrils, which were very hot in the late 60s, are sizzling hot for 2004. (Image of Ebony in "Before" pose - shown to the side)
  Since she had long naturally wavy hair, with a touch of natural curl, hairstylist Lori, decided to take advantage of hot hair trends and utilize Ebony's curl friendly texture for crafting a sultry, sassy ringlet infused do.
 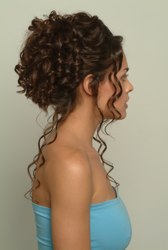 Ebony's naturally wavy hair is medium to thick in texture and falls to the middle of her back. This updo style could be also be modified to work with medium to thick hair that ranges from shoulder length to waist length.
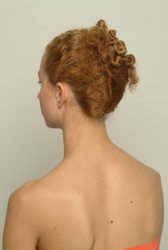 Be sure to always use good styling creams, gels, sprays or similar products to give hair instant texture and stylability. While less may be more, when it comes to creating solid updo styles, too little may not enough.
 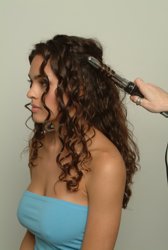 Begin by using a soft boar's head brush or similar natural bristle brush to make sure that all knots and tangles are completely removed.
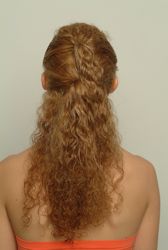
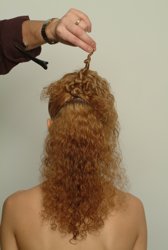 While holding the top section of the loose ponytail with one hand, carefully tuck or slightly flatten the newly looped section of hair against the base of the scalp with the other.
 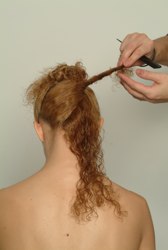 Separate the remaining loose cascading ponytail hair into 1-2" section. Using your fingers or a small round natural bristle brush, form long spiral curls from the base of the strand to the ends. (Image shown to the side). Note: Use the curling iron to touch up any loose curls to achieve a tighter curled look.
 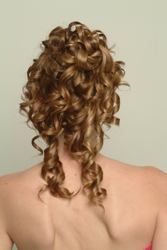 This gorgeous updo works beautifully with strapless or low backed fashions. Since the hair is up and out of the way, it can actually accentuate any gown or silhouette. This romantic do can be glammed up or toned down depending on individual tastes.