


Wanna talk?
HairTalk® is the place for you!
Copyright 1997-2024, hairboutique.com, All Rights Reserved.

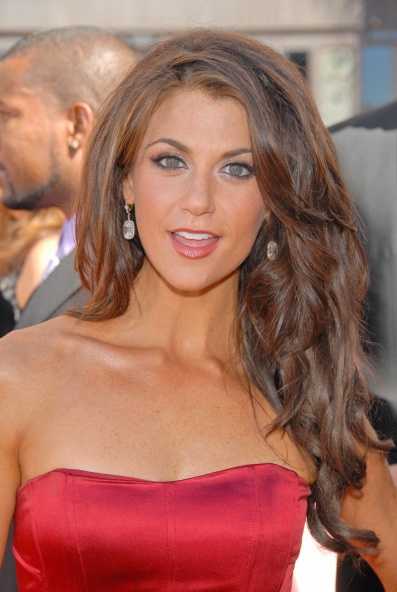
How To - Achieve This Sensual Hairstyle
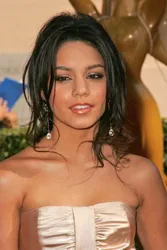
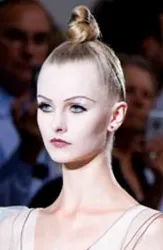
 This simple but elegant hairstyle is showcased on one of the stunning Jovani Prom Gowns. The hairstyle can be worn pulled off the hairline in front (as shown by the Jovani model) or it can be combined with a side-swept or full fringe.
Pulling all the hair off the face does have the advantage of creating a dramatic hairstyle and of course shows off perfect make-up, lips and stunning earrings.
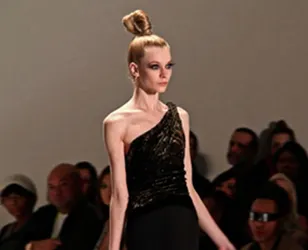
The Modern Nape Knot is perfectly paired with the Jovani gown which features lots of gorgeous ruffles. In this case you don't want your hair to detract from the beauty of the gown.
Suggested Hair Length - Long - Shoulder Length Or Longer.
Hair should either be naturally straight or have the ability to be temporarily straightened with products or during drying cycle. While you could create a Modern Nape Knot on hair which is naturally curly or wavy, you would not be able to achieve the same sleekness.
If natural hair is not long enough to create this style add-on hair is an option. Either have clip-in strands applied or semi-perm fusion extensions to lengthen the natural strands. Detailed steps on How To Do this hairstyle is included below. This hairstyle is rated as difficult because it requires several steps and one of the key steps is backcombing and smoothing all the hair so it can be sculpted into a full classy knot.
The advantage to this hairstyle is that it can be molded and scultped with fingers so that it is tighter or looser. It can also be positioned a little higher or lower near the nape for a different profile. The hairstyle can definitely be coiled into a knot but it can also be formed more into a bun. The possibilities are endless.
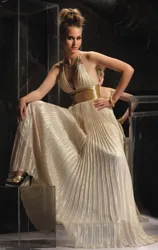
(Image of Jovani Gown #17281 in Pink - Copyright - Jovani.com - All Rights Reserved)
Difficulty Rating - Level 8-9
Hair Tools - What You'll Need To Create This Hairstyle
Blow-dryer - Blax Bonnet or Hand Held
hair friendly elastics or similar Blax in same color as your hair
Crystal encrusted or jeweled headband, bobbies or clips - optional
How To Tips:
 The key to this twisted modern nape knot? Make sure this simple but elegant sophisticate style doesn't fall flat! Before styling your Nape Knot, you can work in a volumizing product at the roots or a sculpting or styling mousse to add maximum control.
(Gown from The Jovani Collection - All Rights Reserved)
This hairstyle is perfect for Prom because the hairstyle doesn't compete with a gorgeous neckline in the front or a cut-out in the back. Even better, this is a timeless and classic hairstyle which is often worn by celebrities on the Red Carpets.
Preparation
Step 1 - Cleanse hair in lukewarm with best products and methods for your hair type, texture and current condition. You may use full strength shampoo, low poo formula (LoPoo) diluted shampoo (DS), conditioner only (CO) or water only (WO).
Step 2 - After cleansing hair rinse well, gently squeeze out excess water with fingers and apply rinse out conditioner from top of ears to the ends. Use hair friendly wide-tooth comb and detangle from ends to the roots while hair is still covered with conditioner.
Step 3 - When detangling is finished do a lukewarm water rinse followed by a cool/cold final rinse to close cuticle and increase natural shine.
Step 4 - Towel-blot hair until damp but not dripping. Blot rather than rub to prevent damage or split ends.
Step 5 - Apply leave-in cocktail including conditioner, detangler, mousse, gel or similar. Distribute from roots to ends. Add root volume enhancer if desired. Use fingers to distribute well. If you prefer use a hair friendly wide tooth comb or pick.
 Step 6 - Blow dry with round boar bristle brush until hair is 50-65% dry. If you prefer to use a long finger diffuser that is also optional.
Step 7 - Separate hair into approximately 8-10 sections that are each 2 inches in thickness. Take 2 sections on each side and 4-6 sections from the middle sections. Start at the middle section of the head at the top of the crown and roll hair over large self-adhesive hair roller. Make sure hair is rolled all the way to the scalp. Continue to roll from the top of the crown down to the nape of the neck.
(Image of short gown from Jovani Prom Collection - Style # 157424B - All Rights Reserved)
Step 8 - On the sides separate the two sections into a top and bottom section. Hold the hair roller sideways and roll up towards the scalp. Repeat with the bottom section. Rollers should be positioned in a sideways angle to help enhance root lift and volume.
Step 9 - When hair has been completely rolled sit under a hood or bonnet style dryer. If you prefer you can use a blow dryer with a concentrator attachment to direct air flow to the rollers. Another option is to use a round boars bristle brush and blow dry until 50% dry and then roll onto a hair roller to cool and set.
Step 10 - Once hair is 100% dry remove all rollers one at a time. Start at the bottom of the hear and work upwards.
Step 11 - Deconstruct curls with a boars bristle paddle brush by brushing through strands from roots to ends. The key is to create lift, volume, bounce and body, but not waves or curls.
Step 12 - Starting approximate 4-5 inches back from the forehead at the crown, separate hair into 4-8 sections. Separate fringe or long layers from rest of hair and clip to one side out of the way. Tease or backcomb each individual section with a brush or comb to create the foundation of the hairstyle. Spritz roots of each section to provide more texture and lift.
 Step 13 - Lightly smooth down all the back combed sections and then use your fingers to direct all of the hair towards the back of the head. Gather all of the individual sections so that they form a big pouffy ponytail base which is positioned slightly above the nape of the neck.
Gently push the base of the pony - before you secure it - with your hands to create volume above the base.
Secure the base with a hair friendly elastics or similar elastic band. Do NOT use rubber bands which can break delicate strands. Use fingers to gently puff up the strands above the base.
Step 14 - Style the fringe in desired way. Optionally you may position headband on forehead and gently slide if back creating a smooth look along the hairline and top of the head. A double V style headband would be a perfect accessory to create a smooth hairline and top with volume behind it.
Step 15 - Gather the tail of the ponytail at the elastic band with your right hand. With your left hand twist the tail clockwise up towards the top of your head and over the Blax pony base. Depending on the length of the tail you will do one to three rotations. The twist should look like a loose round donut.
Step 16 - Once you have the rounded shape to your satisfaction, tuck the ends of the tail underneath and pin securely in place. Gently tuck any other exposed ends of the hair into the new twist. Use your fingers to gently arrange and mold the knot so that it forms a beautiful full shape. If desired, you can gently pull the top strands over the top of the newly formed knot and pin into place to hid the inner circle of the knot. Or you can leave the inner circle visible.
The beauty of this nape knot is that you can't do it incorrectly.
Final Steps:
One you have the Nape Knot shaped to your liking, secure the entire perimeter of the knot with 8-10 bobby pins in the same color as your hair. Angle all bobby pins into the twist in a downward manner towards the nape of the neck. The pins should be hidden within the twist.
If you want to skip the headband but want to add a sparkly bobby or small barrette on one side, position the hair accessory for maximum view.
Final Notes
If you prefer to create this hairstyle at home, be sure to practice before the big event. If you have your professional hairstylist create it, take lots of large photos of the hairstyle including back, front and side to the salon to show what you want.
 When your own hair is not long enough or full enough, be prepared to discuss add-on hair options. Finally, if your stylist advises you against this style for some reason, be willing to listen to alternative options.
To add an edgier look through the top of the head by the hairline to create separation.
(Image of Jovani Short Prom Dress - One Shoulder w/Train #1770-8063 - All Rights Reserved)
More Information
Please follow me on Twitter at: http://Twitter.com/HairBoutique. I look forward to meeting new people from all walks of Twitter and learning from their Tweets.
Visit us at Hairboutique.com located at: http://www.HairBoutique.com, on Facebook, MySpace and YouTube.
Thank you for visiting us at The HairBoutique Blog and for leaving your comments. They are very much appreciated. We apologize in advance but must remove any direct advertisements or solicitations.
Please follow us on Twitter at: https://Twitter.com/HairBoutique. I look forward to meeting new people from all walks of Twitter and learning from their Tweets.

