


Wanna talk?
HairTalk® is the place for you!
Copyright 1997-2025, hairboutique.com, All Rights Reserved.

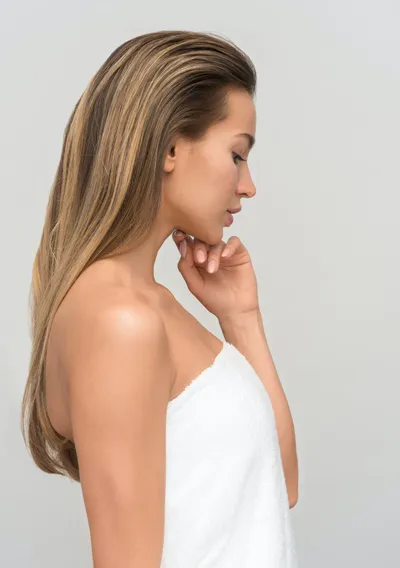
IntroductionDressy Hair Styles - Part #1 covered The Classic Formal Updo, the French Twist. As I mentioned in Part #1, if you can do a basic French Twist you can dress it, dress it down, add jewelry, flowers, feathers or just about anything you can think of. The French Twist can work for any hair length that is medium to long. Even exceptionally long hair can be put into a full Twist or a half up/half down Twist. For more details on the Twist, refer to Dressy Hair Styles - Part #1. In my humble opinion, the next best "dress up" hairstyle for medium to long hair is a hairline braid. My long hair works perfectly in one of the various hairline braids and can be easily dressed up or down depending on the event.
The various hairline braids can be composed of many variations including a Dutch braid, a modified Ribbon Braid or Braided Face Frame or 2-Strand hairline braids. The only thing that a hairline braid requires is medium to very long hair.
A hairline braid requires hair that is all one length and dry. With hairline braids only braid the hairline hair. I usually wear my hair down without any special style. When I have a special event, wedding or party, I will often wear the various braided styles that are presented in this article. Like the French Twist if you want to wear your hair completely up, the various Hairline braids can always be tucked under and pinned up. The braids can also be jazzed up with special touches like hair jewelry, flowers or hair adornments of any type. I have to warn you that a spectacular hairline braid may require some initial assistance from either your hairstylist or a friend that has good braiding skills. The hairline braid is not hard to do, it just requires practice, precision and good visualization skills.
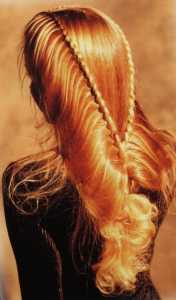
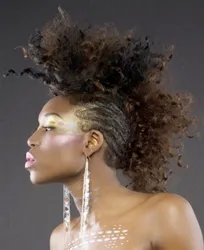
Some Hair DefinitionsMany of the various styling books that discuss braiding use some standard terms. For the purpose of this article I have included a few that are used in the instructions that are included with the various braids. Hairline - This is a line that circles around the face (temple to forehead to temple) where the hair begins to grow. Nape - The back of the neck at the base of the hairline. If a book refers to a plait it means the complete step in the braiding sequence. The strands are the sections of the hair that are twined together to form a braid. The Hairline Dutch Braid
The photo of this Hairline Dutch Braid is taken directly from Jamie Rines Jones' "Braids & Updos Made Easy" book. The gorgeous Hairline Dutch Braid is style #10 in Jamie's book devoted to braids and updos. This is an incredibly beatiful braid that acts like a "net over the free hair underneath". I have included the instructions from "Braids & Updos Made Easy". The book includes black and white illustrations for each step. Because of copyright issues I can't include anything but the modified steps below. I have actually made this braid myself and the steps worked for me. Instructions
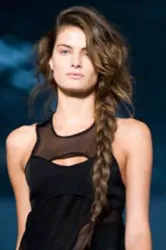
The Hairline Elizabethan Braid
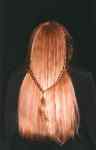
This photo is taken directly from Patrick Cameron's "Dressing Long Hair" book. The Hairline Elizabethan Braid is on page 54 in Patrick's book devoted to long hair styles. This style if much looser and softer than the Dutch braid. Patrick recommends that you hold your hair out from your head when forming the braid to give the style a very loose and soft feeling. This braid also stops at the nape of the neck. I have included the instructions from Dressing Long Hair. The book includes color photographs of the model for each step. Once again, because of various copyright issues I can't include anything but the modified steps below. I have actually made this braid myself and the steps worked for me. Instructions
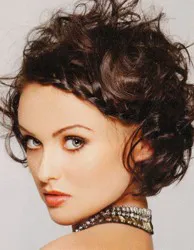
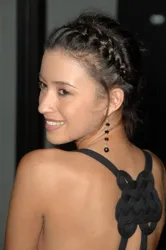
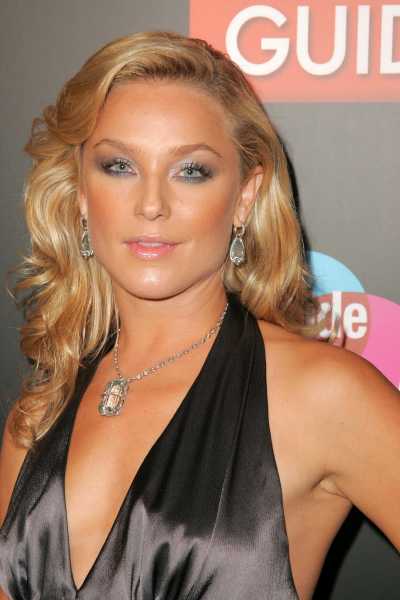
The Hairline Braided Face Frame/2 Strand Twist
This photo is taken from the International Beauty Show Program Guide from IBS Dallas 1997. The hair was done by Alex Cardiel, the model was Jennifer Lee and the photo is copyrighted by Stephen W. Galeener. This braided style is a cross between a traditional "Face Frame" braid and a "2-Strand Twist". The difference is that the IBS braid starts higher up from the temple on each side and as the braid is created, sections of hair are picked up until the nape of the neck is reached. This braid has a lot of fullness on the sides of the head.
When I saw this stunning photo on the IBS program I went to my stylist and asked them to try and duplicate it for me. They didn't duplicate it exactly, but they did create a similar style. Although it doesn't look exactly the same on my hair, it was close. Here are the steps that my stylist followed to create this braid on my hair: Note that you will be creating two individual braids, one on each side of your head using the hairline hair. The key to doing this braid sucessfully is to start the braiding a few inches above the hairline rather than at the end of the hairline. When you are finished the two braids will from a triangular veil over your hair. The two braids will meet at the bottom. Instructions
ConclusionOne of the great advantages with these braided styles is that even the longest hair can adopt the styles. The styles can be worn to any formal event and dressed up with flowers or jewels. These styles can be modified in a variety of ways from tucking the loose bottom hair into a bun, chignon or just pinned under. The braids can be made tighter or looser or started higher or lower on the head. These styles looks smashing, they are versatile and with a little hairspray they will hold for an entire evening. As you can imagine, there are lots more examples of hairline braids that could have been included. This article on the hairline braids is the second in a long series of articles on Dressy Hairstyles. Social Media Network InformationPlease follow me on Twitter at: http://Twitter.com/HairBoutique. I look forward to meeting new people Thank you for visiting us at The HairBoutique Blog and for leaving your comments. They are very much appreciated. We apologize in advance but must remove any direct advertisements or solicitations. - Revised Publication Date: 05/22/10 | ||||||
| If you want to talk more about this or other hair care articles on HairBoutique.com or anywhere else, please post a message on HairBoutique.com's Hair Talk Forums.
Credits For This ArticleI have tried to carefully give credit where credit is due to every photo that is included in this article. If I have forgotten anyone, please let me know so I can fix it. It is never my intention to provide photos or information inappropriately. Therefore if any photos or information is included here against your wishes, please let me know and the information or photos will be removed immediately. |
Please follow us on Twitter at: https://Twitter.com/HairBoutique. I look forward to meeting new people from all walks of Twitter and learning from their Tweets.

