_250h.jpg)
_250h.jpg)
_250h.jpg)


Wanna talk?
HairTalk® is the place for you!
Copyright 1997-2025, hairboutique.com, All Rights Reserved.

Introduction
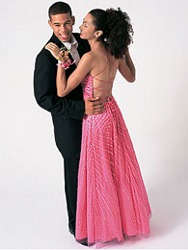
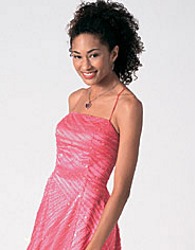
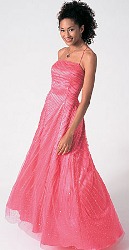
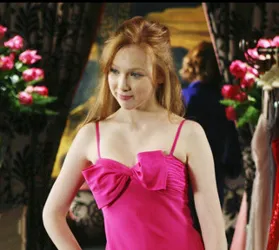
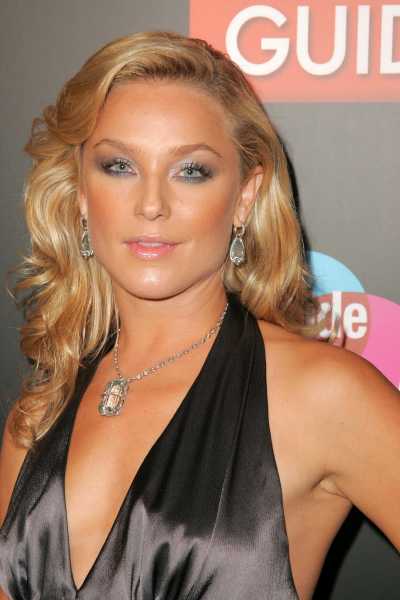
This gorgeous model has a gorgeous upsweep of masses of loose curly pinned up ringlets which work perfectly with her off-the-shoulder gown. The gown has a sensuous plunging front and back design that will show off a graceful neck, curvaceous back and well toned arms. It is simple in design which allows naturally curly hair to shine. This sumptuous dress would be very flattering for someone who wants to enhance their chest area or wants to show off a beautiful back, shoulders or legs. Note: View all our Prom hairstyles by visiting the HairBoutique.com Gallery and selecting the Prom option on the Style selector. You can also look under Updo or Formal for additional Prom hairstyling ideas. It will also help to add flattering lines to any waistline. It would also work well for someone that has an athletic build since it would look smashing against well developed arms and upper body curves. Because the dress is so simple, an ideal hairstyle would be one that is pulled back off the face and elegantly pinned up just like the hairstyle worn by the model to the side. The ringlet infused updo hairstyle that the model is wearing is very elegant, yet relatively simple to do. Even better, it shows off the front and back of the dress to absolute perfection. The hairdo described in this article is designed around carefree ringlets that cascade wistfully from around the to top of the crown and up from the neck. This ringlet infused updo hairstyle can be worn for any formal event. The hairstyle also allows for the addition of a gorgeous necklace, matching earrings and a delicate bracelet.
Pinned Up Ringlets - Steps To Create
This updo may require the assistance of a professional stylist or a friend or family member that can help you fix your hair. Because the hair has lots of curls that cascade down the sides and back, additional hands may be required to achieve a balanced style. If you wish to try this style on your own, be sure to spend time in several practice sessions to see if you can duplicate the look. When you have never worn an updo before, be prepared to adjust to a change in your hair comfort factor. If you are in doubt about how well you would look in this style, have your hair done by a stylist several weeks before your Prom and have a friend take photos. This will give you a chance to look at yourself as others would see your hair. Hairstyle DefinitionThis ringlet updo style is designed to work best for hair that is naturally curly, wavy or of medium thickness with or without long layers. The best length would be shoulder length or longer. Although the models in this article are not wearing bangs, this ringlet updo style could also be created with any type of fringed front hairline. Hair that is fine or thin may not adopt well to this style unless add-on hair (see Jessica Simpson HairDo) is incorporated into the look. If you wish, you can also experiment with a foam filler in the same color as your hair to give your hair instant volume and boost. Another option is to use a volumizing shampoo and gel or spray to blow up the hair cuticle. Natural curls or waves can be incorporated easily into the style. Face Shape Considerations
This elegant sleek style highlights the face along with the dress. Although most face shapes will be flattered by this style, if your face is long and thin it is better to design the updo so it lays closer to the head with more volume added along the sides. Oval and heart shaped faces will look beautiful in this style. Square faces can achieve balance by carefully pulling ringlet tendrils down around the jaw and cheeks to soften. Round face shapes can achieve a slimming effect by adding more height at the crown, adding tendrils at the cheeks and playing with a light dusting of side parted bangs or hairline tendrils. Best For Hair/Length/ConditionThis curly updo would work best for chin to shoulder length hair that is naturally curly or wavy. Although medium textured hair may be curled to duplicate the look, if hair does not easily hold a curl, this updo would pose some challenges. If your own hair is not long enough to re-create this look or if you have a hard time creating the necessary ringlets, consider the Hollywood Hair method to instantly lengthen or re-texturize your look with the addition of a Jessica Simpson HairDo. Visit our Jessica Simpson HairDo Page. Wear any Prom hairstyle you desire by going longer or shorter in an instant with any of Jessica Simpson's Instant Clip-In Extensions. Instructions
If possible, create this look on hair that is not freshly washed. Right after a shampoo hair tends to be soft and slippery and harder to work with. This is especially true for an updo style. If you prefer to create the style on newly washed hair be sure to dress the hair well with styling creams, gels or lotions to help anchor the style for long term wear ability. Step One: Prepare hair for this updo by washing naturally curly or wavy hair the day before the Prom and drying by using a long finger diffuser to create tight ringlets. To lock in curls or to create them on hair that is not naturally curly, set hair overnight on tiny rag or foam or spiral curlers to create lots of tight curls. Step Two: Use a brush or comb to smooth and gather all of the hair on either side of the head above the ears and pull back to form a half pony that sits high on top of the crown. Merge the hair to form a very tight angled ponytail sculpture. Make sure that all of the surrounding scalp hair is sleek and smooth. Secure the half pony with a Blax or hair bungee or similar. Step Three: Place the 2nd finger of your right hand approximately 1 1/2 inches below the new half ponytail base on top of the ponytail's hair. Step Four: Fold the entire half pony upwards towards the ceiling and over your finger forming a small loop. Hold the new hair loop firmly in place.
Step Five: While holding the new hair loop use bobby pins in the same color as your hair to pin the top of the loop into place. After it is secure remove your finger from the loop and then flatten it gently against your scalp. Pin the bottom of the loop. This should lift your ringlets up higher at the back of your crown and anchor them with a pinned seam so that your half pony ringlets cascade down the rest of your hair Gently move the new cascade aside and clip to get out of the way. Step Six: Take all of the remaining hair from the bottom of your head and divide into two equal sections. Part the two sections straight down the middle. Step Seven: One at a time pull each of the two bottom hair sections up and over the half pony section so that the hair is up near the base of the half pony. Try to arrange each of the two sections so they are pulled up the same distance from the bottom and create a balanced form and shape. Remember to take your time and check each section as you pin. Make sure that each section is firmly pinned once you position it.
Step Eight: Pin each section of the bottom hair so that the ringlets cascade down from the base of the first half pony. Release the half pony ringlets that were pinned to the side. Use your fingers to blend and merge the hair together with the ringlets from the bottom sections of your hair. The final result should be a very securely pinned cascade of wild ringlets and curls. Step Nine: Spray the style by spritzing well with a good hairspray like Phytolaque, Phytolaque Soie or similar. Note: If you prefer bangs, these can also be added to the hairstyle. Keep in mind that if you modify the style from the instructions the look will not be identical to the photos shown in this article. For more info on bang options check out Celebrity Hair: Bangs & Fringes Leave long tendril sections to cascade down around your face. If you want tighter tendrils use a 1/4 to 1 inch barreled curling iron or hot rollers to give you a tighter ringlet. Optionally you can also use the curling iron to touch up loose ringlets that need shaping. Step Ten: Carefully tuck away and pin any remaining hair ends from obvious view. Decorate the finished updo style by adding one or more gorgeous fresh or silk flowers or add floating hair crystals in the form of hair snaps, hair magnets or Velcro snaps. If you prefer wear this beautiful style without any hair adornments. If you use fresh flowers, wait to pin them into your hair right before you leave for the Prom to keep them as fresh as long as possible. SummaryThe hairdo described in this article is designed around carefree ringlets that cascade wistfully from around the to top of the crown and up from the neck. Even better, this style can be worn for any formal event. The updo hairstyle also allows for the addition of a gorgeous necklace, matching earrings and a delicate bracelet. Note: A special thank you to Alfred Angelo for sharing this gorgeous gown with HairBoutique.com. If you would like to purchase a similar Prom gown go to the Alfred Angelo site for a list of retails stores that carry a similar dress design. Social Media Network InformationPlease follow me on Twitter at: http://Twitter.com/HairBoutique. I look forward to meeting new people Thank you for visiting us at The HairBoutique Blog and for leaving your comments. They are very much appreciated. We apologize in advance but must remove any direct advertisements or solicitations. - Revised Publication Date: 04/24/11 | ||||||||||||||||||||||||
| If you want to talk more about this or other hair care articles on HairBoutique.com or anywhere else, please post a message on HairBoutique.com's Hair Talk Forums.
|
Please follow us on Twitter at: https://Twitter.com/HairBoutique. I look forward to meeting new people from all walks of Twitter and learning from their Tweets.

