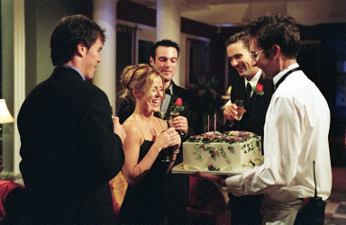
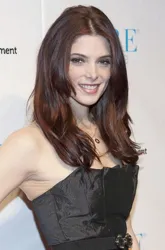
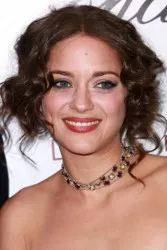
 Trista Rehn, the first Bachelorette on the reality television dating show, wore a gorgeous barrel curled updo on one of her hot fantasy TV dates as well as during the episode where she celebrated her 30th birthday on the episode. (Photo, L-R of Ryan, Trista, Russ, Charlie & Waiter at Trista's Birthday Party - ABC/BOB D'AMICO - The Bachelorette).
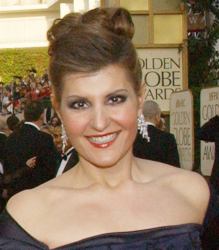 Many celebrities also opt for gorgeous curled updo to dress up their red carpet strolls for the various annual awards shows. (Photo of Nia Vardalos at 2003 Golden Globe Arrival Show - NBC Special - Nia Vardalos - NBC - Photo: Paul Drinkwater - All rights reserved).


Wanna talk?
HairTalk® is the place for you!
Copyright 1997-2025, hairboutique.com, All Rights Reserved.

Introduction
One of the finalists on the second Bachelor series, Gwen, also wore her hair up in a curled updo for her special Cinderalla-esque date with Aaron Buerge. Yes, Gwen looked instantly more romantic and sexy with her fine blonde hair swept up on top of her head.
Regardless of hot hair trends, some people believe that an updo is an absolute must to transform into an instant belle of the ball. Although it is always best to have a hairstylist create the perfect updo for you and your hair type, if you want to try your hand at crafting your own sexy style, follow the steps listed below for a sensuously curled updo.
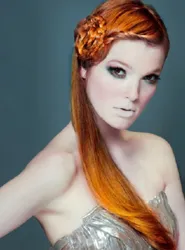
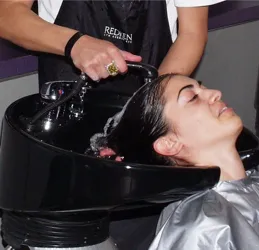
Step By Step InstructionsThe following updo style is perfect for medium to bra length hair that is naturally straight or has been straightened to wear with this style. 1. Shampoo your hair with your normal products. 2. If you must use a rinse-out conditioner, be sure to use as little as necessary to prevent hair from being overly soft or slippery. 3. Apply a good defrisant balm or serum and a straightening product. Use a paddle brush and blow dry your hair straight. 4. Divide hair into individual sections that are 1 to 1 1/2 inches. 5. Apply a setting gel or spray to each section before you roll onto a curler. Use large curlers that are the same size as the section of hair you select. 6. Start rolling hair at the front of the hairline near the forehead. Lift each section of hair into the air. Starting at the very tip of the hair roll the curler up and back towards the crown. 7. Work from the front of the hairline to the back of the head and down towards the nape of the neck. Make sure that the curls are all rolled the same direction which is up and back. Roll the sides so that the curlers are positioned towards the back of the head. 8. After all the hair is rolled and pinned securely in place, mist with a setting spray. 9. Sit under a hood or cap hair dryer if available. Or use a blow dryer set on the lowest, hottest setting. Carefully direct the air flow to each individual roller for a few seconds until the hair is heated and completely dried. 10. After each curled section is heated, let hair cool off completely for up to 30 minutes or longer if desired. 11. Carefully remove the curlers starting at the front and working towards the back of the head. 12. Let hair cool a few minutes longer. 13. Using your fingers, lightly fluff and shake out the curls. 14. Arrange the front of your hair in desired bangs/fringes. 15. Create your standard part. If you prefer, dress up your style with a zig zag parting. 16. Beginning at the very front of your head, near your forehead, take an individual section of hair that is approximately 1 inch in thickness. Wrap the hair carefully around your index and middle fingers. This should create a type of barrel curl. 17. Position the curl on your scalp and then pin securely with hairpins that match your hair color. Adjust the barrel curl to be thinner or thicker depending on the amount of hair you have and how many curls you wish to attach. Play with how flat or full you want the curl to stand up on your head. 18. Continue to work from the front of your head to the back creating the same barrel curl formation. Leave the hair on either side for last. 19. After you have completely curled and pinned your hair focus on the remaining side hair. 20. Pull each of the two sides around to the back of your head, wrapping around the curled formation to "finish" the updo look. 21. One you have pulled the sides around to the back and smoothed them in place, pin securely. If there is any remaining "tail" or ends, carefully roll into a barrel curl and pin in place to complete the updo look. 22. Pull a few random strands from the updo around your face and at the nape of your neck to soften the look. If you prefer, use a curling iron to create soft tendrils. 23. Rub a little hair paste or cream into the palms of your hands and smooth lightly over all the ends of your updo to make sure that all stray hairs lay flat. 24. Lightly mist with hairspray to hold. 25. Add random jeweled accessories ranging from glittery hairsnaps, magnets or jeweled hairpins. Closing DetailsRemember that not everyone looks great in an updo. Depending on your coloring, the shape of your face and the condition of your hair, you may not like yourself in an updo. To guard against disappointment, play with creating the style at a few dress rehearsals before the big hair day. Ask a friend to help you practice and advise you how to modify the style to flatter you. This updo is a relatively easy look to create at home for your Prom, wedding or other special hair event. This basic updo can be easily modified with a variety of techniques from making the curls smaller or larger, crimping or braiding the side hair or leaving the curl "ends" splayed up in the air. Although this style might be created on waist length or longer strands, part of the hair would need to be left loose and long underneath the curled crown area. SummaryIf you have your heart set on an updo style for your special evening, take your time, have fun and experiment until you have the right style for you. |
| If you want to talk more about this or other hair care articles on HairBoutique.com or anywhere else, please post a message on HairBoutique.com's Hair Talk Forums.
|
Please follow us on Twitter at: https://Twitter.com/HairBoutique. I look forward to meeting new people from all walks of Twitter and learning from their Tweets.

