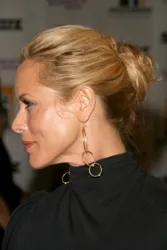
 This buckled curl chignon, will never go out of style. Celebrities are especially fond of chignons since they can be the perfect hairdo for sashaying down the red carpets.
 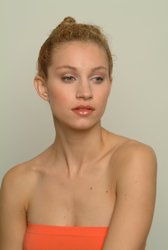 The key to this curl enhanced design is to have enough hair thickness to allow for the creation of a series of bucled curls twists around the perimeter of chignon.
  The style could be easily modified to work with medium to thick tresses that range from shoulder length to waist length.
 While this style might be accomplished at home with the help of some talented friends or family members, because the back involves the creation of buckled and twisted curls, when in doubt, ask your stylist to craft the style for you.
 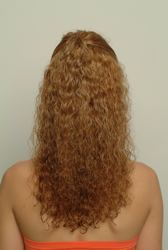 1. Begin by using a pick or your fingers to make sure that all knots and tangles have been removed from all of the hair.
 parts. Lift approximately 2 inches of the front section at the top. Using your hands gather the strands into a tight ponytail with a high base that rests near the back of the crown area. 4. Make sure that all of the hair is as smooth as possible. Let the tail of the ponytail flow freely down over the rest of the hair in the back.
 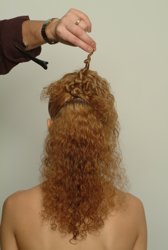 a second ponytail with a base that rests at the middle of the back of the head. Secure the new ponytail with a "hair friendly" Blax, Bungee or other elastic band. Let the tail of the second ponytail flow freely down over the rest of the hair in the back. Note: When finished you should have two stacked ponytails with loose flowing tails that overlap. You should also still have the loose bottom section of hair.
 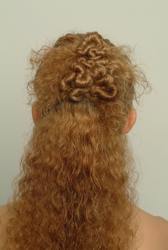 Use your fingers to smooth each individual chunk of hair that is to be buckled. Lift the strand away from the head at a 90-degree angle using your thumb and first finger. 9. While holding the chunk halfway from the scalp and the end of the strand start to twist the piece in a clockwise direction. Continue to twist until the strand buckles back on top of itself.
 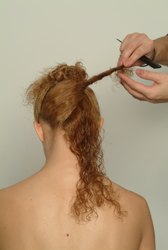 Continue to lift and buckle curls from the remaining bottom strands. Working across the back of the head in a diagonal direction lift individual strands, twist and buckle. Then pin the new twist near the base of the other buckled curls. Note: Because of the thickness of each buckled twist you may need to use more then one bobby or hairpin to secure the twist flatly. Use as many pins as necessary. Don't worry if they are visible since the curls will eventually cover the top of the crown area where the individual twists are secured.
 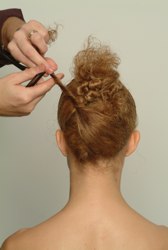 As you finish the the twisting process make sure that all remaining strands have been incorporated into the style. As you continue to add new twists you will have a mass of loose "tails" from the finished twists. Make sure that the "tails" are directed to form a type of loose ponytail base at the back of the crown area.
 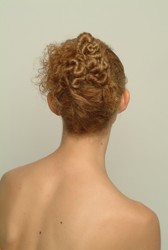 Direct the cascading curls into a uniform flow pattern with “hair friendly” bobby or U shaped pins as needed.


Wanna talk?
HairTalk® is the place for you!
Copyright 1997-2025, hairboutique.com, All Rights Reserved.

Introduction
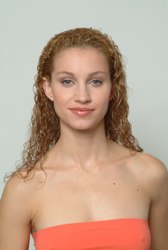
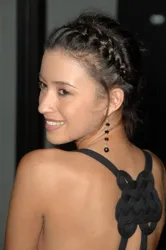
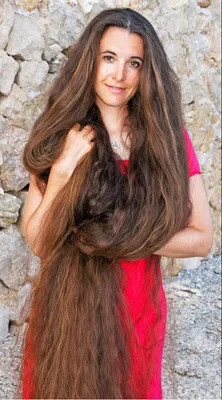
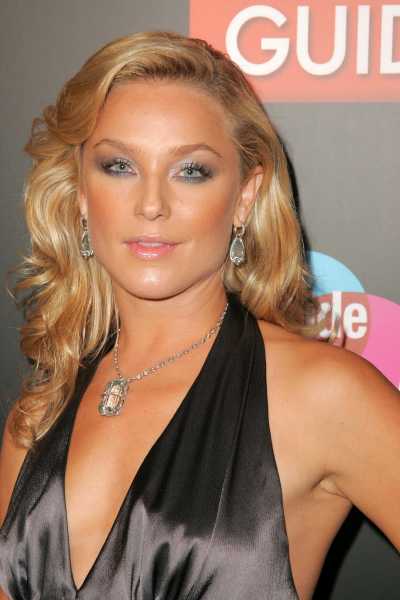
This spectacularly buckled style combines a super curlyl chignon with endless rows of perfectly formed buckled curls that softly hug the back of the head allowing curls to nestle into an amazing creation. Claire (shown to the side) has finely textured naturally curly hair that when left to its own devices, forms a very tight curl. Her face shape is a cross between a a classic oval and a heart. In order to create a spectacular this buckled curl updo on Claire's bra-strap length hair, her strands were first washed, blow dried with a diffuser to enhance her natural curls and then spot curled with a focus on creating tight ringles from the roots to the end. Any hair that is either naturally curly, wavy or straight can easily be fashioned into a similar style. Tresses that are stick straight can be fashioned into a version of the style with the proper curling products and hot tools. Thin or fine hair may require extensions or pin-on tresses. Getting Started Notes
Although Claire's style was designed without any parts of fringes to show off her beautiful face and gorgeous eyes, a variety of different parts and bangs could easily be incorporated into a customized version. Since Claire's very curly hair had to be washed prior to creating this style, her newly washed and dried strands were “prepared” with lots of styling products so that her strands were not so soft.
Best Styling TipsClaire's finely textured, naturally curly hair, falls to her mid-back. This style works best for hair that is shoulder length or longer, and either naturally curly, permed or pre-set and pre-curled.
Short hair lengths could be transformed into this style through hair extensions or the temporary use of clip-on tresses. Regardless of the hair's texture, type or actual length, it is important to start with strands that are dressed properly with the necessary styling products. Keep in mind that freshly washed hair may be overly soft and slippery, making it challenging to style. If you prefer to work with newly washed hair limit your use of conditioners or other products that make strands slippery soft or hard to manage. When possible, create this style on "aged" hair that is not newly washed. Natural hair oils help the updo hold tighter and last longer.
If you wish to add hair accessories be sure you have them ready to be added to the style at the end. Remember to use good styling creams, gels, sprays or similar products to give hair instant stylability. While less may be more, when it comes to creating dressy updo related styles, too little may not enough. Creating Style At Home
If you do decide to do the style at home be sure to have several practice runs before the night of the big hair event. This updo style involves a lot of fine detail pinning and combing. Keep in mind that when crafted properly, the style can take some time to finish. Instructions - Steps To Create
2. Create a vertical part that extends from in front of one ear across to the other. After you have created the new part you should have a separate front and back section of hair. Clip the back section off separate from the front section. 3. Separate the front section into two additional 5. Secure the ponytail tightly with a “hair friendly” Blax, Bungee or other elastic band. 6. Grab the remaining section of the top hair and form 7. Depending on the number and the size of the buckled curls to be created, separate the top of the two ponytail into to 1” thick strands. 8. 10. Hold the newly buckled strand tightly at the end of the strand. 11. Carefully position the buckled curl so that it snuggles against the back of the head. Anchor securely with bobby pins the same color as the strand. 12. Repeat the buckling steps on each individual strand until all of the strands have been buckled, positioned and pinned securely against the scalp. Note: Twist the buckle curl to the very end of each strand except in the case of 4-6 optional strands that ring the perimeter or the chignon area. If desired, leave a long “tail” section on 4-6 outer strands. As the perimeter buckled sections are pinned into place, fan the longer tail sections out to protrude from the rest of the chignon. 13. Continue to create buckled curls on the first ponytail until all the strands have been twisted. Repeat this buckling process on the second ponytail. 14. Arrange the buckled curls from the first and second ponytails so that they form a balanced chignon shape. Note: The key to this look is uniformity. Strive to make all the curls the same size and tightness. When possible it is best to work from the inside of the buckled configuration out. It is also best to start near the top of the style and work down towards the nape of the neck. When in doubt create a few practice styles to figure out the most efficient way to create the best chignon style. 15. Spray the newly buckled curls with a strong hold hairspray. 16. 17. 18 When all the twists are in place, use your hands and fingers to capture all the loose "tails" and arrange them in a loose cascade around the side of the twisted area near the crown. Note: Keep in mind that the cascading curls should ideally be arranged to hide any pins holding the twists against the scalp. 19. 20. Spray well with hairspray like Phytolaque or Jessica Simpson’s favorite Phytolaque Soie made with real silk. 21.Apply a drop or two of a shine serum like Phyto's PhyoLisse, Rene Furterer's Spray Gloss or Robert Hallowell's Love That Shine Drops to the palms of your hands. Rub the serum into the palms and then lightly glide over the top of the style to add instant shimmer and shine. 22 Attach any desired hair accessory. Remember to always attach accessories last after all styling products have been applied to avoid damaging delicate accessories. Finishing TouchesThis dressy curled chignon style is a classic, elegant study. It works beautifully with any type of sophisticated or elegant fashions. Keep in mind that when this elaborately twisted hairstyle is created according to instructions it is a versatile style that can work with just about any type of gown or fashion. This hairdo can be toned down or glammed up depending on individual tastes. |
| If you want to talk more about this or other hair care articles on HairBoutique.com or anywhere else, please post a message on HairBoutique.com's Hair Talk Forums.
|
Please follow us on Twitter at: https://Twitter.com/HairBoutique. I look forward to meeting new people from all walks of Twitter and learning from their Tweets.

