


Wanna talk?
HairTalk® is the place for you!
Copyright 1997-2024, hairboutique.com, All Rights Reserved.

Introduction
Hair Banding is commonly referred to as a hair styling technique which is used by those with natural waves, curls, kinks and coils to stretch out the hair. The purpose of traditional hair banding, popular with natural hair, is to use elastic hair bands to extend the hair to full length while it's damp or wet to prevent it from shrinking. People with natural texture who are looking to transition their hair will use banding instead of blow drying or hot ironing in order to get hair stretched enough for trims or to create a stretch afro of hair puff. Hair banding is also used as an updo styling technique and for high fashion hairstyles. Banding can be time consuming, but many love the results and feel the time is worth it whether the hair is banded to stretch it out for trimming or styling or for an updo of high fashion hairstyle. One of the downsides of hair banding for either stretching or styling is that you may lose some of your natural texture with this technique. Unless it's done properly, hair banding may also create a waxy appearance as a result of the elastic band imprints.
How To Band
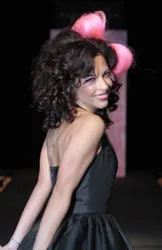
Band from root to the tip of the hair. As your hair dries it's stretched without the use of any heat. The smaller the sections the straighten the hair without waves. Banding may be done wet or dry, but if the goal is to stretch hair to prevent shrinking than damp or wet hair is best. 1. Cleanse according to desired methodology including Shampoo, Diluted Shampoo (DS), No Poo Shampoo (No Poo), Lo Poo Shampoo (Lo Poo), Cowashing (Conditioner Only) Water Only (WO) or other methods. 2. Apply deep conditioner or rinse-out conditioner. 3. Detangle hair with fingers or wide tooth comb from ends to roots while conditioner is still applied. 4. Leave conditioner in hair up to one hour. 5. Rinse all conditioner our of hair. 6. Finish with a cool/cold rinse. 7. Optionally you can separate hair either into one large ponytail or into several sections which are 2-3" in thickness. How you decide to section your hair and how many bands you use depends upon whether your goal is to straighten hair or create a unique hairstyle like the one shown in the images provided. 8. Once you have created the desired section or sections of hair to be banded, coat the section with liberal amount of leave-in conditioner. Detangle gently with fingers or wide tooth comb. 9. Apply an elastic band to each section starting at the root. Work down the length of the section smoothing downward. Wrap bands at equal distances from each other and the roots and ends. If you are unsure of the ultimate results you wish to obtain with your hair then be sure to experiment with either one pony that is banded or several different sections. You can also create bands at different distances from the previous band.
Note: Do not use rubber bands or any type of bands with metal on them. Bands with metal may cause broken hair. Rubber bands will also break hair and may need to be cut off rather than pulled off. Blax bands work well if the bands are to be cut off. Bungee bands work because they can be easily unhooked but will need to be wrapped tightly to achieve the desired results. Goody Ouchless Bands without metal also work well. Remember, the smaller the section of hair that is selected and banded the more the hair will ultimately stretch if naturally curly, wavy, kinky or coily. 10. Repeat until all of the hair has been banded. 11. Allow banded hair to dry overnight. 12. If you don't wish to create the hairstyle shown in this article and wanted to band to straighten hair without heat, then remove bands by cutting with a scissors being very careful not to nick or cut hair. Optional High Fashion Banding Methods
If you wish to create the high hair fashion banding hairstyle shown in the images in this article then you can either create one ponytail and band it or you can do the following: 1. Cleanse hair, condition, detangle, blot dry and apply styling products. 2. Separate hair into 3-4 equal horizontal directions and blow dry straight with paddle brush. 3. Direct all hair back from head and create ponytail with a base at the top of the head. 4. Starting at the top of the ponytail work down in equal distances and create a banded section using elastics the same or contrasting color of your hair. Note: To achieve the rounder shapes add foam hair donuts to each section in different sizes to create the unique design. 5. Spritz each section of hair with firm holding hairspray to achieve a high lacquer finish and to hold hair in place. 6. Work down the length of the hair until all sections have been created. If you wish for the hair to stand up or out from the head you will need to use a special wire as you create the style to direct the finished banded pony out and away from the head. Many high fashion hairstylists would not only use foam hair donuts and wire but would most likely use add-on hair to achieve the length, thickness and shape. Summary
This banding technique also works for a variety of dry twists, more simple updos, knots and buns. Experiment with banding to create a wide array of unique hairstyles totally your own. Keep in mind that hair artists like Derek J and similar who compete in the high fashion hairstyling competitions have a wide range of tricks up their styling sleeves. Of course there is always the side benefit of unbanding the hair for amazing new textures created solely by hair banding. Social Media Network InformationPlease follow me on Twitter at: http://Twitter.com/HairBoutique. I look forward to meeting new people Thank you for visiting us at The HairBoutique Blog and for leaving your comments. They are very much appreciated. We apologize in advance but must remove any direct advertisements or solicitations. - Revised Publication Date: 04/27/11 | |||||||||||||||
| If you want to talk more about this or other hair care articles on HairBoutique.com or anywhere else, please post a message on HairBoutique.com's Hair Talk Forums.
|
Please follow us on Twitter at: https://Twitter.com/HairBoutique. I look forward to meeting new people from all walks of Twitter and learning from their Tweets.

