


Wanna talk?
HairTalk® is the place for you!

Copyright 1997-2024, hairboutique.com, All Rights Reserved.

Introduction
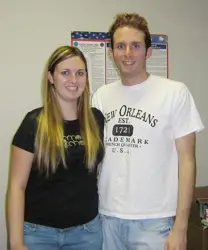
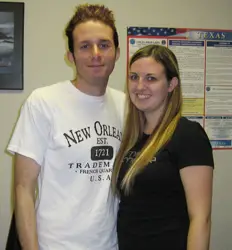
Everyone at HairBoutique.com is serious about testing new hair related products that becomes available on both the professional and consumer hair markets. Before HairBoutique.com decided to carry the HairDo line of clip-in hair extensions, Karen Shelton (HB CEO & Founder) and I both wore the synthetic as well as the human hair versions to understand all the pros and cons of the clip-in systems. Karen and also worked together to test Jon Renau using my own head of hair as the testing ground for the synthetic and human hair clip-ins. Although Karen has spend the past ten years researching and studying hair extensions, I am relatively new to hair extensions although I do enjoy learning about new hair extension options. Also, I am a better hair model since my hair is slightly below my shoulders but Karen's natural hair extends approximately 5" below her waist and is not ideal for extending. Recently it was agreed that HairBoutique.com would start a series of evaluations on hair extension systems available in the Do-It-Yourself (DIY) consumer marketplace. Drafting resident hair professional, Billy J. Johnson, it was agreed that Billy and I would order one of the many DIY hair extension kits on the marketplace. We purchased a DIY hair extension system which is advertised and billed as a system that anyone should be able to do at home by themselves.
To guarantee that everyone on the HairBoutique.com evaluation team remained impartial, the kit was completely paid for by HairBoutique.com funds. The initial order was placed over the web at the kit maker's website on Wednesday, July 18th. Payment was handled through PayPal which caused an initial snafu since PayPal would not accept the credit card for some unknown reason. An email was dispatched to the kit maker's CustomerCare inquiring about a possible different payment method. The good news was that customer care emailed quickly in response to offer an alternative payment method which would have been through an invoice process. The customer care person was very helpful in trying to arrange payment when the PayPal system misbehaved.
I decided to try again and after a second attempt with the PayPal system I was able to finalize my DIY order on the morning of Thursday, July 19th using the HairBoutique.com credit card. Decisions, Decisions, DecisionsAfter some discussion with Billy it was agreed I should order the DIY hair kit that was based upon 16" of human hair, classified as Remi hair. I ordered the Dark Blonde/Light Brown color. Also, the kit's adhesive, which adheres the extensions to the natural hair comes in colors which are automatically matched based on the hair extension shade ordered. Available adhesive colors include gold/blonde, brown and black. The total amount for the DIY Kit was $219 plus $8.95 for shipping. The only shipping option was through the United States Postal System (USPS).
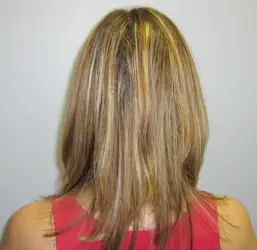
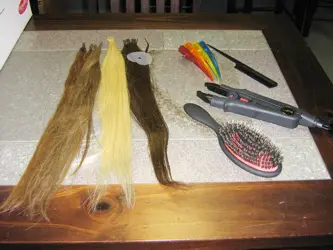
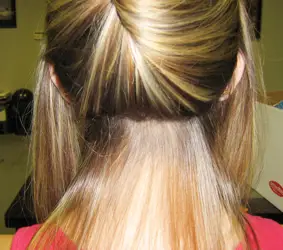
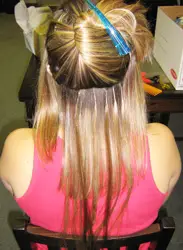
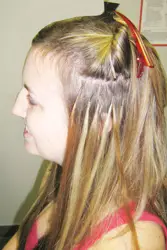
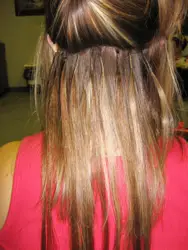
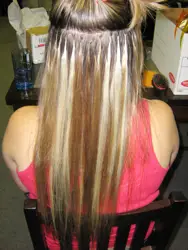
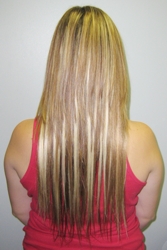
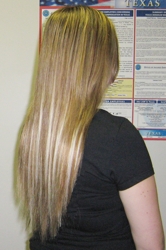
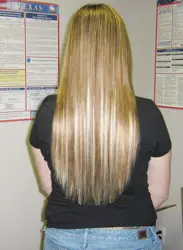
This caused a slight challenge after the initial order processing since it was impossible to track my package through the USPS system. I was not sure exactly when my kit would arrive. I received a Ship Email from the DIY Kit's distributor on Tuesday, July 24th letting me know that my DIY Kit had shipped. The kit arrived on Thursday the 26th at the HairBoutique.com warehouse. The guys knew I was waiting anxiously for my kit so they literally walked it directly to my office. DIY Hair Extension Installation KitBilly and I agreed to schedule the DIY kit installation on my shoulder length, layered hair for Saturday, August 4th. That would give Billy and I both time to examine the DIY, read the instruction pamphlet and watch the DVD. It would also give us a better window at the HairBoutique.com offices when most of the staff would be out of the building. The building has a special room in the back of the building equipped with a sink, shower and appropriate accessories for cutting hair and doing various hair related testing. One of the biggest advantages to the DIY Kit system is the fact that kit comes with everything you need for the installation except scissors. Since the Remi hair included in the kit arrives on an approximate 4 foot span of machine wefted hair, you do need to have good scissors to cut the individual pieces. Billy provided his professional hair cutting scissors which consisted of Bonika which are Japanese scissors. includes the following items: 1. Four brightly colored hair clips 2. Pre-tipped hair strands tipped with Keratin Glue 3. 2" Plastic Spatulas for stirring the wax in the melting pot 4. Remi Hair 5. Hair Clips (claw style) for holding hair while applying the extensions. 6. Comb 7. Instruction Brochure 8. Application instruction DVD (part Powerpoint, part voice over, part cartoon). Actual InstallationOn Saturday, August 4th Billy and I met at the HairBoutique.com building at 1:00 pm. Although Karen (Shelton) was in the HairBoutique.com building and available to help, she had minimal participation wanting to let Billy and I test this as a true DIY hair extension process. It was clear immediately that I would not be able to section my hair by myself or apply the extensions to the back of my head by myself. This was an initial concern from the beginning but Billy and I decided to play it by ear to see if I might actually install the hair extensions myself. Billy agreed and we revised our installation plan on the fly to have him do all the installations. It was decided that Billy would install the DIY extensions for me since he is a hair pro and could section the back of my head much easier than I ever could. Aroma Of Melting Wax And Related ChallengesAlthough we started close to 1:00 pm the wax took almost 30 minutes to completely melt. The DIY Kit instructions said "wait until hot" but we were unsure how long we should wait. Therefore, we decided to be "better safe than sorry" and let the wax melt for a full 30 minutes. While waiting for the wax to completely melt and to partially escape the intense aroma of the melting substance which smelled a little like burning hair to me, Billy and I jetted out to Wendy's to grab some lunch. Billy described the aroma of the melting bonding agent as "a strong fishy smell". For anyone trying this system Billy and I would suggest you melt the wax bond in an area that is well ventilated. Open some windows or use this in a room that has a lot of air circulation. That would definitely help with any aromas. Note: Some people using the DIY system may not notice any aroma when melting the wax bond. It might depend on a variety of factors including the heating pot used, room where you were located. Since Billy and I had never worked with this type of DIY hair extension system or this type of wax adhesive product we freely admit that we may have had some user errors. However, another challenge to us was the liquid consistency of the wax bond. Billy pointed out "he had to constantly stir the melted liquid or it would start to separate". To make sure he had maximum adhesive power Billy would stir the wax before dipping each new strand. When the liquid started to separate it would be clear on top and murky on the bottom. Karen described the wax bond "as being similar to a Cafe Au Lait" or "hot chocolate". Maybe we did not need to stir as often as we did but Billy and I were concerned about making sure the wax bond was at optimal heat and consistency. We also both appreciated the little stirring spatulas that were very helpful. Applying The StrandsFollowing the DIY instructions, Billy started applying the individual sections of hair along the nape of my neck. He also followed the DIY kit's suggested 3-4 ratio which means that for every section of my hair that he sectioned, he cut a strand of DIY hair (from the long hair curtain along the top) to be equal to approximately 2 1/2 - 3" times larger than my natural hair section. Using the enclosed DIY hair extension kit claw style clips Billy sectioned my hair along the back. To help Billy position the individual strands, I held the target section while he first dipped the newly cut Remi hair and then dipped the tip into the melting pot of wax bonding material. Once he dipped the hair and had the tip covered with the adhesive mixture, he placed it against my own hair approximately 1/2" below my roots. Billy then pinched the tip of the extension section against my own hair and held it to make sure it adhered completely. Once the wax bond cooled off to a certain point, Billy used his fingers to roll the newly formed waxy bonds to get them nice and round as well as to make the attachment point less obvious. This was a recommendation in the DIY system instructions. Throughout the entire application of the strands my role was to hold my natural hair while Billy cut and applied the new strands. I also literally stirred the wax bond pot to make sure that we had the proper consistency. Long ProcessSince the DIY kit is based on single strand hair extension application, that literally means that you have to cut and apply a series of many different individual strands. After five hours of work Billy had cut, dipped and applied over 80 different hair extension strands to my hair. Billy worked from the nape of my neck to approximately 2" below the top of my crown. Along the front and sides he applied the hair extension strands within 1/2' of my hairline. This might not work for everyone but because my natural hair is heavily layered it was easier to blend the extension strands so that they would not be easily visible to others. One of Billy's key concerns throughout the very long process was making sure that he sectioned my natural hair as cleanly as possible. He also was concerned that I did not end up with a "Mullet Look" where my new longer strands appeared to be their own style that did not blend with my shorter layers. Luckily with careful planning, Billy avoided any obvious Mullet appearance. Working As Fast As PossibleBilly expressed some challenges with the system. He noted that his concerns would probably be the same with any type of single strand application method and not limited to the DIY kit system. These basic concerns were tied to the fact that Billy burnt several of his fingertips while pressing the hot wax bond dipped hair against my own hair. He also had problems with the hot bond when he was pinching the newly dipped hair ends into my natural hair. The melted wax was extremely hot and there was no other way to apply the extension hair but to pinch it into my own hair. If there was another way we did not figure it out during the DIY install process. Again, since we were new the DIY system we should point out that user error could have been the cause of Billy's burnt fingers. After we finished Billy wondered if gloves might have helped. Maybe, but would he have been able to pinch the add-on strands as tightly with gloves? Hard to say as an afterthought. Billy also noted that the Remi hair "was prone to shredding, unraveling and tangling". Also, the strands were different lengths and required Billy to "trim them to even them up". Billy noted he "had to work fast" when "cutting the strands and dipping it into the wax bond to make sure "the hair did not unravel" before he could "attach it" to my hair. After
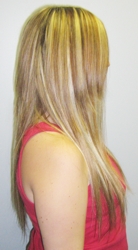
To pass the time Billy and I set up speakers for my IPod and we rocked out during the DIY extension process. Yes, we had fun just two work friends hanging out while extending my hair. It seemed like a lot of work and a lot of time but I was excited watching the slow but steady transformation of my hair. Billy commented that I actually look good "with long hair". Certainly my own hair has never been this long before and I did love the changes I could see in the mirror. Throughout the entire process Billy would stop and take photos so that we could record the process. When we were completely finished my head and hair felt different. If I had to describe I would say it was almost like I had a new hair helmet of sorts on my head. Not sure if this is how it always feels for people dong hair extensions or if I felt this way because it was my very first fusion type of hair extensions. I also felt that I needed to treat my hair with special care, almost as if it was fragile and it could break. Again, this was my reaction to having so much length added and not a criticism against the DIY hair extension system. I did adjust and started flipping my newly long hair all around. I will confess that I really enjoyed flipping my head around to feel the new hair. I also ran my fingers through it and was amazed at how long my hair felt. I did notice at first that there seemed to be more weight at my scalp. I think this is because I have baby fine hair and the texture of the Remi hair is coarse with a hind of wave or bend. It didn't hurt my head but there was an initial sense of general heaviness. I will confess that the hair extensions do feel lighter on my head then the clip-ins I have worn from various manufacturers. I must also note that the longer I wore the DIY extensions, the more I got used to them until I stopped noticing that initial heaviness. It is important to note that the hair definitely did not hurt my head at any time nor did I worry that is was damaging my natural hair in any way. Taking My Hair Out Clubbing
After Billy was finished with the installation, we let the wax bond cool in the melting pot. We had a small amount of Remi hair left and put that aside in case we needed to fill in any spots. I left the HairBoutique.com building shortly after 6:00 pm and went home and dressed up to go clubbing. I loved the reaction of my friends who told me "you look like a completely different person with longer hair". Although I enjoyed wearing the HairDo and Jon Renau clip-in extensions in the past, once I got used to the feeling of all that extra new hair, I really enjoyed the lightness of the new hair attached to my own strands. The new hair felt different but I am sure that it's because it was my first time with fusion style extensions. ProsBilly and I made a list of the Pros and Cons of the DIY installation. Please keep in mind that Billy and I tried to be as impartial as possible and based this review on our own experiences. Everyone who uses this system will have their own experiences which may or may not be similar to ours. The DIY Hair Extension kit I tested offer advantages which includes the following key points: 1. The DIY System comes with everything you need to do the extensions except scissors. This one-stop kit is very convenient for DIYers who don't have time to stop and buy all of the individual components. 2. There is a large variety of colors to select from. This one-stop kit is very convenient for DIYers who don't have time to stop and buy all of the individual components.
3. The hair color selected for my hair was a perfect match. Even though my hair currently has a wide range of highlights and lowlights the DIY hair extension kit I ordered matched perfectly. It was almost as if hair elves had custom colored the strands to match mine. This was a wonderful advantage. 4. The wax bond is selected to match and blend with hair color selected. I don't know if this is a normal deal but as a newbie to DIY Hair Extensions I found it to be a big advantage. It is nice to have an adhesive material that does not give your new hair extensions away or show through existing hair. Even though the area where the hair was attached felt slightly waxy, it did not feel heavy or feel like it was hurting my own natural hair. 5. Get Hot Clubbing Accessory I loved the reaction of my friends who told me "you look like a completely different person with longer hair". Although I enjoyed wearing the various clip-in extensions in the past, I really enjoyed the relative lightness of the new hair attached to my own strands, after I got used to the initial feeling of heaviness from all the hair. The new hair felt different but I am sure that it's because it was my first time with any time of fusion style hair extensions. 6. The system is very affordable This DIY hair extension system is great for people on a budget who want to try DIY hair extensions at home. No, the results are probably not going to be the same you get from a professional at a salon, but for a fair price you can try hair extensions.
7. The system is designed to last for a reasonable amount of time Based on my own experience with this DIY system I believe that the extensions will last for several weeks. I can't swear to how long at this point because I have only had the hair in for one week. However, I will write a follow-up in the coming weeks to report back on my long term experiences. 8. DIY Kit Provides Good Customer Care Billy and I did not encounter any major problems ordering the DIY system. However, the few problems we did have were responded to very quickly. The DIY maker was very helpful and responded to all of our questions and concerns. This is important when buying off the Internet as we at HairBoutique.com understand completely. We deal with customer care every day and these DIY people did a good job in this area.
Cons
The following are the disadvantages that Billy and I experienced? 1. Major Time Investment This would be problem with any individual strand extension method. While it's possible that Billy and I could do better and faster on future installations, for this first installation it took a very long time to complete the process. One of the biggest Cons was how long the application took. From beginning to end Billy and I spent approximately 5 1/2 - 6 hours (including set-up and clean-up) and used over 80 individual add-on hair strands. Note: Please note that the longer Billy worked with the DIY system, the faster he got with the method. I believe in a second DIY install he would be much faster at the application method. With enough practice and installs I might also be able to do the system myself. This type of extension system, from any vendor, not just this particular vendor, is time consuming and would be a disadvantage to anyone on a tight schedule. 2. Not Easy To DIY
I can't speak for all the Do-It-Yourselfers out there but when it comes to doing my own hair I have limited skill sets. A key part of this system is the need to carefully section the hair before applying the individual hair strands. While it may be possible to use a series of mirrors to create the sections and apply the strands, I was not able to do that for myself. I am sure there are very talented DIYers out there that could section and apply the DIY system to their heads. I am also sure that with some practice many people could learn to do this themselves. For me it was not an option. I would advise any first timers to get help from a friend that had some basic hair handling skills to help make sure the installation went smoothly. 3. Hot Glue Challenges Billy had the most problems with the hot glue and how it burnt his fingers. In all fairness, while I felt some warmth on a few select strands during the installation process, I did not feel any burning on my scalp. It's hard to imagine any adhesive materials, wax bond or similar, that did not have some sort of aroma. Afterall, it has to be strong enough for successful adhesion of the extension hair to the natural hair. Maybe gloves or other protective finger gear might be used to protect tender tips. Maybe not. However, this was a concern to Billy who was required to pinch the hot wax bonded hair to my own hair. Another workable solution would be to have a cup of ice cubes or ice water to dip hot fingers into in order to neutralize the heat factors.
I should also mention that while the wax bond had a strong aroma, the hair did not and had a fresh smell that was nice. 4. Hair Texture Challenges While the hair color and wax bond matched my own hair really well, the texture of the hair was more coarse than my hair with a slight bend. My own hair is fine, silky and naturally straight. Although the hair was straight when we received it, the texture mismatch was obvious to me. Maybe not so much to my friends but I definitely felt the difference while styling the hair. This is not necessarily a complaint against the DIY hair extension system since it is my understanding that any time you buy hair for extensions it is imperative that you get the closest texture match possible.
Maintenance
One of my own personal challenges with the new DIY system was the fact that my own hair is fine and needs to be washed daily to avoid oil and dirt build-up. Since the Remi hair that came with my DIY kit is coarse, wavy and feels dry, I have been careful to avoid getting shampoo on the hair extension sections. I have been shampooing my own hair with my favorite Rene Furterer shampoo products that I normally use. Note: I also love Okara Protective Radiance Shampoo which is a color protective shampoo for my heavily highlighted hair (CPF 70, +70 % color protection) and preserves the color intensity thanks to its anti-fading action. Color is protected, hair feels soft and looks luminous, longer. To help eliminate the possibility of tangles on the extension section I have been using John Frieda Leave-in conditioner. I spray the leave-in onto my fingers and apply the leave-in conditioning product by "finger picking" carefully through the extensions. The combination of the Rene Furterer and John Frieda products helped make the extension hair feel very soft, even silky. It would also be an option to use a dry shampoo like Rene Furterer's Naturia product (or similar) on the top of my hair and avoid frequent washing of the Remi hair. Other Comments
Although the DIY kit provided an instructional brochure and DVD, I felt that more information might have been helpful, especially for a DIY hair extension novice like myself. Although Billy has done some hair extension systems in beauty school, his experience is also limited in this area. We were both learning as we went through the process together. There is a mention that the Remi hair, after being removed, can be saved and reused. Unfortunately I did not understand how to actually to manage the preservation of the Remi hair once it is removed from my own hair. I did find a lot of really great information on the HairBoutique.com HairTalk board that has a fabulous DIY Hair Extension forum. I was very appreciative of all the great tips that the many long time visitors posted. Both Billy and I got great info from the HairTalk board. If you are into DIY or want to be, you must stop by this board and read the thousands of incredible helpful hints. Note: Other helpful DIY forums or related pages include: HairExtensions101.com and DivaWebdzine.com. Summary
Billy and I both really liked the DIY Extension Kit. It is definitely affordable for consumers on a budget. The company was helpful and provides good customer service. When Billy and I compared notes we both agreed that we both liked the DIY Hair Extension System but would probably not be willing to do any type of individual strand application any time soon. We also agreed that we would like to continue to test different Do-It-Yourself hair extension systems designed specifically for consumers. Although Billy is a hair professional he is also a consumer and we both have a special interest in being able to provide Hairboutique.com visitors (both consumer and professionals) with our own experiences. My plan is to continue to wear the DIY Hair extensions as long as possible. I certainly have learned that I enjoy "instant long hair" and have a new understanding of the many DIYers in the hair extension world. I have been bitten by the hair extension bug and love, love, love the quick transformation. My own hair has never, ever been this long before and I adore the feeling of hair cascading down my back and flipping it around. Now I know why Karen loves her ultra long tresses so much. I also plan on testing many different hair DIY and professional hair systems over the next coming year. We will test other "kits" as well as have my hair professionally extended to get a clear comparison. I will also test all types of hair from many different hair vendors to give a fair analysis of different extension hair origins. Note: All of the products listed in this article including the entire René Furterer product lines are available at HairBoutique.com in the Marketplace. To talk more about Do-It-Yourself Hair Extensions or other hair extension information be sure to visit the HairBoutique.com HairTalk forum dedicated to hair extensions. | |||||||||||||||||||||||||||||||||||||||||||||||||||
| If you want to talk more about this or other hair care articles on HairBoutique.com or anywhere else, please post a message on HairBoutique.com's Hair Talk Forums.
|
Please follow us on Twitter at: https://Twitter.com/HairBoutique. I look forward to meeting new people from all walks of Twitter and learning from their Tweets.

