|
||||||||||


 |
|
| May 16, 2013 | To ensure delivery of this email, please add newsletter@hairboutiquemedia.com to your contacts. |
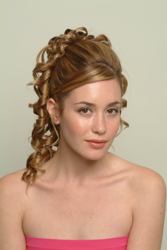
The Perfect Curled Updo!  This Week's 20% Off Coupon: GETHEALTHYHAIR20 An array of big beautiful curls nestle elegantly into the back of this elegant and stunning updo style. This spectacular hairstyle combines sensual full volume near the hairline and crown and is embellished with a circle of perfectly formed fat round curls. Any hair which has a tendency to be stick straight can be fashioned into a similar fat curl style with the proper styling products and hot tools. Thin or fine hair may require extensions or pin-on tresses. Getting Started Notes Casey’s naturally fine straight hair falls to her mid-back. This dressy style could be modified to work with medium to thick tresses which range from shoulder length to waist length. The key to this curl enhanced hair design is to have enough thickness of hair to allow for a series of thickly rolled curls to cluster in the back. This style would work well for hair that is naturally straight or has been permanently or temporarily straightened before this style is attempted. Short hair lengths could be transformed into this style through hair extensions or the temporary use of clip-on tresses. Although Casey’s style was designed with a side swept fringe and a small angled part to show off her beautiful oval shaped face and gorgeous eyes, a variety of different parts and bangs could easily be incorporated into a customized version. This style could also be worn without either.
Natural hair oils help the updo hold tighter and last longer. Keep in mind that freshly washed hair may be overly soft and slippery, making it challenging to style. If you prefer to work with newly washed hair limit your use of conditioners or other products that make strands slippery soft. Before you start make sure that you have all the proper tools including plenty of hairpins, a good brush and comb. If you wish to add hair accessories be sure you have them ready to be added to the style at the end. Remember to use good styling creams, gels, sprays or similar products to give hair instant texture and stylability. While less may be more, when it comes to creating dressy updo related styles, too little may not be enough. While this style might be accomplished at home with the help of some talented friends or family members, because the back involves the creation of fat curls, when in doubt, ask your stylist to create the style for you. If you do decide to do the style at home be sure to have several practice runs before the night of the big hair event. Instructions - Steps To Create 1. Begin by using a soft boar’s head brush or similar natural bristle brush to make sure that all knots and tangles are completely removed from all strands. 2. Working from side to side with individual sections that are about 1 to 2 inches in thickness, Allow hair to cool completely before proceeding. Use a volumizing spray and apply to each individual section lightly. Then run a traditional or ceramic barreled flat iron through the tresses to straighten. After you run the iron through each section the “hair will get sort of crunchy and flat, flat, flat” according to Robert. If you elevate each piece high above the ears while ironing it you will achieve a super straight effect with lots of volume on the ends, which is one of Robert’s straightening secrets that he uses on his many celebrity clients. 3. Using a rattail comb or brush, part off a section of fringe hair from the rest of the crown section. Clip out of the way. 4. Using your hands in conjunction with a comb or brush, gather a small section of hair approximately 4 inches in thickness at the top of the crown in the back section. 5. Hold the ends of the new section straight out from the scalp with one hand. Use a fine-toothed comb or small brush with the other hand to backcomb the hair towards the base in sharp sweeping strokes. 6. With the other hand, run the comb down the length of the hair from the end towards the scalp in short sharp strokes. Continue to backcomb the section until the desired volume is achieved. Spray this teased section with a firm hold hairspray. 7. Once the first section is completely teased, pick up the next section of hair and repeat the process until all of the back hair has been completely backcombed. 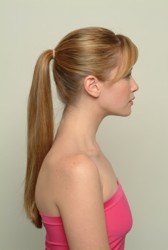
8. Use a firm hairspray to completely spray all of the teased hair. 9. Using both hands carefully smooth the teased hair making sure there is a lot of height at the crown. 10. Brush hair smoothly back from the hairline. Using your hands in conjunction with the brush, gather the back section of hair up into a mid-back ponytail making sure that the top section of the crown is pushed up to maintain maximum fullness and volume. 11. Secure the ponytail with a “hair friendly” Blax, Bungee or other elastic band. The gathered base of the ponytail should rest approximately 6-8" up from the base of the head. 12. Position bobby pins in the same hue as the hair around the outside of the base to act as an anchor for future curls. 13. Starting at the top of the ponytail near the base, lift a 2-4” thick strand of hair from the newly formed ponytail. Clip the rest of the ponytail temporarily out of the way. 14. Using your fingers or a round brush, carefully form a smooth bcurl around the base of your finger. For extra hold, use a good setting gel to prepare each chunk of hair before forming the curl. 15. Position the new curl against the scalp and anchor the curl at the tail section with bobby pins in the same color as the hair. 16. Spray the first curl with firm hold hairspray. 17. Continue to form a series of 2-4” curls that nestle softly into each other in a well-balanced If desired, pin a few of the curls near the middle section of the strand allowing the “tail” to protrude freely from the curled configuration creating a flirty splay of hair. Note: Ideally the updo should contain 6 to 8 same sized curls. More or less curls can be created by separating the individual strands of hair into small or larger sections. 18. When all the curls are completely formed and arranged, spray well with a strong hold hairspray. 19. Release the fringe area. Lightly backcomb, spray and pin into a side swept position against the forehead. 20. Apply a drop or two of a shine serum like Phyto's PhyoLisse to the palms of your hands. Rub the serum into the palms and then lightly glide over the top of the style to add instant shimmer and shine. Spray well with hairspray. 21. Attach any desired hair accessory. Remember to always attach accessories last after all styling products have been applied to avoid damaging delicate accessories. Finishing Touches This dressy barrel curled style is an ornate hairstyle. It works beautifully with any type of more simple fashion that does not detract from the elaborate beauty of the style. This hairdo can be toned down or glammed up depending on individual tastes. |
 The style was created on
 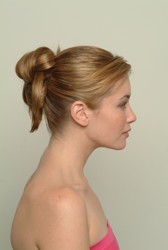 smooth all of the hair with a
 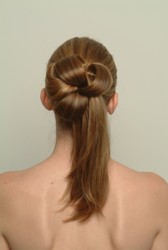 circular formation.
 | If you would like to consult with Karen personally about any of your hair questions, please see our Ask Karen page. We would love your feedback about this newsletter! Share your thoughts and ideas with us! |
 |
 |
 |
 |
 |
 |
| Copyright 1997-2011, hairboutique.com, All Rights Reserved. Terms of Service, Privacy Statement, Advertise, Contact Us, Press |
| Please note that you are receiving this mail because in the past you signed up for the HairBoutique.com mailing list. This mailing is in full compliance with U.S. Federal requirements for commercial e-mail under bill s.1618 Title 111, Section 301, Paragraph (a) (2) (c) passed by the 105th U.S. Congress. According to FTC Rules we wish to note HairBoutique.com is a member of the Amazon Affiliate Program. Any items purchased as a result of this newsletter may result in a commission being paid to HairBoutique.com |

