


Wanna talk?
HairTalk® is the place for you!

Copyright 1997-2024, hairboutique.com, All Rights Reserved.

Introduction
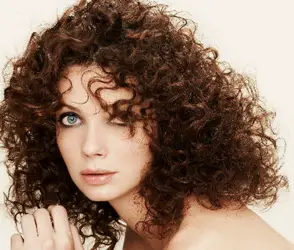
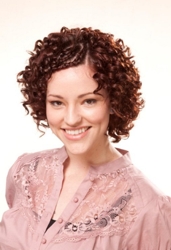
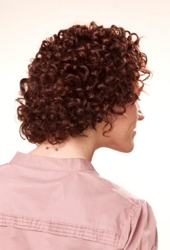
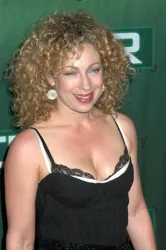
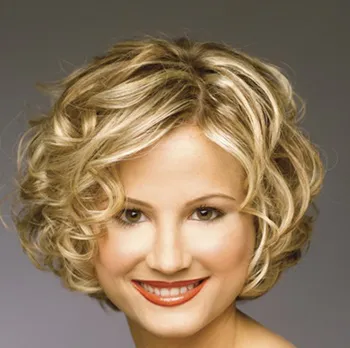
The goal with diffusing is to reduce frizz and seal in moisture and shine. There is a lot of confusion about hair diffusers, how to use them and insider tips and techniques. This article will cover everything you need to know about diffuse drying or diffusing dry your hair. 1. Types (thin/fine, medium, thick) of hair suitable for diffusing 2. Textures of hair and how it can be diffused 3. Types of hair diffusers (finger diffusers, sock, Deva, built-in) 4. Speeds of hair diffusers 5. Advantages to diffusing 6. Disadvantages to diffusing 7. How to diffuse hair 8. Best products for diffusing 9. Secret tips and techniques 10. Disrupting Your Natural Curl Formation 11. Facts and Fiction 12. Tips For Diffusing Natural Curls Types of Hair Suitable For DiffusingBasically anyone with any type of hair from fine/thin to very full can use a diffuser to dry their hair. However, the type of hair which will see the most obvious results are those with hair that has natural bend or texture such as waves, curls or kinks. A diffuser can only achieve a finite amount of results based on the hair type and texture which is diffused. Anyone with all types of hair should experiment with diffusing their hair. If you desire to diffuse then do it but be willing to take your time and find your best way.
Textures of Hair And How It Can Be Diffused
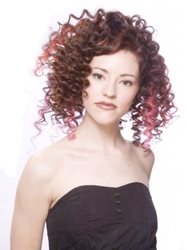
Basically anyone with any type of hair from fine/thin to very full can use a diffuser to dry their hair. However, the type of hair which will see the most obvious results are those with hair that has natural bend or texture such as waves, curls or kinks. A diffuser can only achieve a finite amount of results based on the hair type and texture which is diffused. I certainly encourage anyone with all types of hair to experiment with diffusing their hair is that is their desire. Types of Hair DiffusersHair diffusers can be either: 1. Built into the actual blow dryer 2. Add-on attachments which are placed onto the end of the blow dryer nozzle. There are more than one type of hair diffuser including the following most popular types: 1. Long finger diffuser - a cup style attachment that attaches to the nozzle of a blow dryer with long "finger" style knobs. Long finger diffusers often have a cup or bowl area for hair to nestle into. 2. Short finger diffuser - a flat blow dryer attachment with either short "fingers" knobs. The short finger diffuser often does not have a base for hair to rest in like the long finger style of diffuser. 3. Base diffuser which is built into the side of the blow dryer and either has short square notch openings or a special diffuser vent. 4. Sock style diffuser which looks a lot like a sock which is placed over the nozzle opening of the hair dryer. 5. DevaFuser which is a customized style of diffuser attachment which looks literally like a plastic hand. The DevaFuser can be attached to the nozzle of a blow dryer like traditional long and short finger diffusers.
Speed of Hair DiffusersDepending on the type of hair dryer utilized, the diffuser attachment can be operated at a Low, Medium or High speed and a Low, Medium or High Heat. Sometimes the hairdryer will have a cool, warm or hot setting. While most hair professionals suggest that the best diffusing is done on a low speed, low heat, some hair consumers have had great results using a diffuser on the fastest speed and highest heat. Ultimately everyone has to experiment with the way they ultimately diffuse but it's important not to expose hair to high heats which can burn delicate tresses. Advantages To Diffusing Hair1. If you prefer to air-dry, plop or wet bun your hair, diffusing it will help you avoid walking around, especially in challenging weather with wet hair. 2. It helps to maintain the curl pattern. 3. Diffusing, especially if done strategically, will provide lots of great root volume. Disadvantages To Diffusing Hair1. It takes longer to dry hair then with a regular blow dryer. 2. When hair is not diffused properly it may increase the risk of frizz. 3. Holding the diffuser close to the head can cause arm and hand fatique.
How To Diffuse Hair - General Instructions1. Cleanse hair, apply a rinse-out conditioner and finish with a cool/cold shot of water. 2. Towel blot hair to remove excess moisture 3. Apply leave-in conditioning cocktail consisting of your favorite leave-in conditioner, mousse or other styling products. 4. Spritz on heat protectant. 5. To add extra volume spritz a volumizer to the root area only. 6. Separate hair into individual 2-3" sections. Only work on one section at a time and clip off the rest of the strands. 6. Use a blow dryer set on a medium speed, medium heat. Keep speed and heat consistent and do not change either speed or heat settings until the very end with a cool/cold blast will help to set the hair. 7. Keep fingers away from hair as much as possible and let the diffuser attachment do the majority of the drying work. 8. Work in a systematic direction around the head from one side to the other. How To Diffuse With Long Finger DiffuserFollow Steps 1-8 above. In addition do the following: 9. Hold the diffuser at a 90 degree angle from the head to help lift roots away from the scalp. 10. Allow air from the dryer to flow through one section of moist hair at a time. Only work on one section of hair at a time. 11. Direct the fingers of the diffuser through the strands lifting and using circular motion to make sure the air is moving through all of the hair. 12. Allow the ends of the hair to rest in the base of the cup of the diffuser.
How To Diffuse With Short Finger DiffuserFollow Steps 1-8 above. In addition do the following: 9. Hold the diffuser at a 90 degree angle from the head to help lift roots away from the scalp. 10. Allow air from the dryer to flow through one section of moist hair at a time. Only work on one section of hair at a time. 11. Direct the fingers of the diffuser through the strands lifting and using circular motion to make sure the air is moving through all of the hair. How To Diffuse With DevaFuserThe results are out about the DevaFuser either alone or with the SunDryer. Some naturally curl girls believe the key to success with DevaFuser is not to move it around too much but keep it firmly planted in one place. It is also important to note that not all dryers are compatible with the DevaFuser. Follow Steps 1-8 above. In addition do the following: 9. Hold the diffuser at a 90 degree angle from the head to help lift roots away from the scalp. 10. Allow air from the dryer to flow through one section of moist hair at a time. Only work on one section of hair at a time. 11. Direct the fingers of the diffuser through the strands lifting and using circular motion to make sure the air is moving through all of the hair. The DevaSun Dryer and Devafuser are designed to provide great volume. It also makes hair fall so much nicer around the face. I still use a regular diffuser to finish drying, but I would not be without the Devafuser. The key is to leave it in place for a couple of minutes before moving it.
Most dryers have more power than curly girls need. The DevaSun dryer does not get as hot so it can't fry delicate hair or scalps. The DevaFuser does a very nice job on roots, and gives lots of lift. Possibly because of the power of my dryer, I don't find it does as good a job on the rest of my hair, which is ridiculously fine, and tends to blow every which way in the strong airflow if I try to use it like a regular diffuser. Combine DevaFuser with a Babyliss radiant heat dryer to dry the rest. The combination works well. DevaFuser Compatible Blow DryersAccording to the folks who make DevaFuser the following blow dryers are compatible:
When in doubt be sure to get confirmation in writing that your DevaFuser is compatible with the blow dryers listed above. How To Use The DevaFuserIt comes with instructions? It was tricky at first. I use it and also still use my traditional bowel diffuser too. I like them for different things. It's great to use after plopping but before clipping on the roots. You can put it "in" the length of your hair and/or use it like a "hand" to gently lift the hair. Basically you use like a "hand". You can gather and lift curls. You can't take it all the way to the scalp nor can you easily scrunch hair. It works great to dry the roots after putting in root lift product. This works great when the hair length dries but scalp remains damp. Use Devafuser to get lift and completely dry the roots. Clip the top while hair is warm. Finish up with the bowel diffuser. Lots of work. Some find it awkward to use. There's no wrong way to use it. It takes a learning curve.
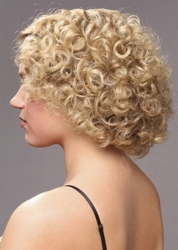
Add volume to your hair using a hair dryer with a diffuserFollow Steps 1-8 above. In addition do the following: 9. Hold the diffuser at a 90 degree angle from the head to help lift roots away from the scalp. 10. Allow air from the dryer to flow through one section of moist hair at a time. Only work on one section of hair at a time. 11. Direct the fingers of the diffuser through the strands lifting and using circular motion to make sure the air is moving through all of the hair. 12. Bend over at the waist and direct hair over the top so that the roots fall away from your scalp. Use the diffuser upside down to add extra volume. 13. Direct the hair dryer at the roots to acquire maximum volume. When your hair is dry, throw your hair back and brush to shape. To set the style and achieve a ‘long-lasting’ effect, finish by blowing a ‘cool shot’ through your hair. Pixie-Curl Diffuser MethodWith the pixie-curl method you turn the diffuser off before moving it to the next set of hair to be diffused. To read more about this popular method follow this link: Curly Hair Styling – Scrunching Curls With Diffuser For Abundant Tight Ringlets Big Curl Clump Diffused Method
The key to ensuring big curl clumps during the diffusing process is during the cleansing process. After hair is cleansed with Conditioner Only (CO), with a Low Poo Formula (LoPo) or with Water Only (WO) the hair is rinsed with lukewarm water. All excess water is gently squeezed out with fingertips so that hair is not soaking wet. A thick rinse-out conditioner is applied. The hair is then detangled with a wide tooth hair friendly comb or fingers to remove all snarls and tangle. Once hair is completely detangled then take all the tresses in your hands and then flip hair over the top of your head. Bend at the waist if you prefer. Scrunch the conditioner through curls and waves until it feels like wet seaweed with a lot of squish. This will encourage clumping of curls, coils and natural patterns. Allow the conditioner to remain on the hair encouraging clumping until the end of the shower. At the end of the shower flip hair over again and rinse upside down with cool water. Squeeze excess water out of hair with fingers fanned out like an accordion. Apply a good leave-in cocktail and plop hair with a hair friendly towel or t-shirt. Allow hair to be plopped for up to 30 minutes (or more if that is your best routine). Remove the plopped hair, separate into sections and then diffuse with a long finger diffuse. Best Products For Diffusing
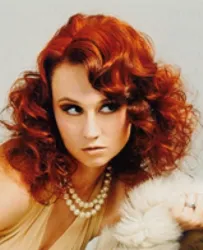
Consider the following styling products with your diffuser techniques: Mousse 1. Scrunch your hair with about a dime to a quarter size of mousse before using the diffuser. Make sure to distribute throughout the entire head. Be sure to detangle completely before diffusing to prevent unnecessary frizz. Gel 2. When you desire curlier hair, scrunch hair with gel while wet, and use the diffuser to dry while scrunching. Styling Cream Styling Wax Secret tips and techniques for diffusingIt's generally a much slower process to diffuse hair then to blow dry when using a concentrator. Hair can be any length to be diffused although the best length is shoulder length or shorter for creating bigger curl clumps or more defined waves. The longer the hair, the more weight will impact the formation of curls, kinks and waves. Diffusing will most likely not help straight, damaged, super frizzy, ultra dry, and/or fragile hair unless special steps are taken to address these concerns. Disrupting Your Natural Curl Formation
Curly Girl (CG) Guru Lorraine Massey has invented her own form of a finger diffuser so there is less concern about disrupting the natural care pattern. In fact, many Massey followers will refer to their care methodology built around their natural curls as the CG Method. It simply means they follow Lorraine's tips from her original "Curly Girl: The Handbook." Getting Great Natural Curls By DiffusingDepending on the individual curl or kink pattern, there are different methods to use when diffusing hair. Strategic Section Clipping With DiffusingOne method is to try diffusing hair for a bit and then clipping part of the crown of the hair up and back before finishing the diffusing method. If you clip the hair before you diffuse you might get an odd looking or frizzy pattern. Bottom line, you need to experiment. Pop clips in at the crown while hair is still warm and it will set nicely. Experiment With Head PositioningHead position can be very important when diffusing. You may wish to experiment with diffusing hair with all of the hair pushed upside down until it's half dry and then flipping hair back and diffusing right side up. This can help create great root curl. Each person will need to experiment with how dry to allow their tresses (50-95%) to get before stopping the diffusing process. Some believe a combo of plopping, diffusing and air-drying is the optimal system for the best curl clumps, waves and absence of frizz. For some people diffusing past 75% dry it can result in hair becoming very big.
If you have a hair part you wish to incorporate into your look, its important to figure out how diffusing will ultimately impact it. Arrange hair around part in order to diffuse appropriately. The hair part may need to be clipped first before you diffuse around it. The front of the hair may also fall into the face unless the diffusing is done properly. Flipping hair side to side instead of upside down may provide better results for some. The shorter the hair the different methods of diffusing which may need to be considered. Using different products provide different results with creams, oils and butters creating different results than gels, foam or mousse products. Jury rig a mirror opposite your bathroom mirror that will help you get the back of your head. If you have shower doors so you can just put a tilting mirror on the door and that works. Remember your hair may look bad while it's still partly wet, so keep that in mind before giving it up. Combine Air-Dry With DiffusingAnother method is to allow hair to be plopped or air-dried for 10-20 minutes after all styling products are applied. The lower hair of hair often tends to dry faster then the rest. Diffuse about 95% and then let the rest air-dry. You might also try plopping for 5-10 minutes after all styling products are applied. Direct hair upside down and flip hair back up and air dry for one hour. Then diffused side to side until hair is 95% dry. Diffuse crown area around any parts to add volume. This can provide great curls with minimal frizz. Tips For Diffusing Natural Curls
A lot of hair breakage occurs to natural curl, waves and kinky curls because of improper detangling. Although most curly hair experts recommend using your fingers, the key is starting with properly conditioned strands. If you get better results with a wide tooth comb or pick, then use what works best for you. 1. Remember, when you wear your hair natural, adding back moisture is key. If your hair is chemically treated the need for moisture is doubled. If damp strands aren't first prepped for detangling with a rinse-out conditioner in the shower and then a cocktail of leave-in conditioning products, tresses will naturally be harder to detangle hair, regardless of the detangling tool used. 2 Apply a rinse out conditioner that works for your hair's normal texture, type and condition. Consider trying a color co-ordinated mask such as Okara Restructuring and Protective Radiance Mask to intensify your existing color. Avoid using the conditioner on super fine hair or near the roots. 3. Finish with a cool/cold rinse to close the cuticle and help add natural shine. 4. Towel blot (never rub or rough dry) to remove excess water. Remember to take your time blotting and detangling your hair. Keep untangled hair tucked down to prevent air from prematurely drying it out. Dried out strands cause breakage. If you are using bobby pins to pin up your different sections be sure to only use pins with covered ends.
Also, use extra large bobby pins, especially if your hair is thick because the bigger pins will penetrate easier into hair that is thick, extra curly or bushy. 5. Divide hair carefully down the middle of your head with your fingers. Divide the hair until you have six to eight sections and pin up each section until you are ready to detangle them.Coat damp strands with your favorite customized styling product cocktail containing styling tools such as a defrisant, volume building mousse, gel or other styling products that work best with your hair texture and type. In general it's best to stay away from conditioning and/or detangling products which contain lots of alcohol or petroleum which can coat your hair and block out natural air flow. If you get to a knot of tangle that is particularly difficult to detangle you can either apply a little more leave-in conditioner or detangler to your fingers and then work through the knot. 6. Whether you detangle with your fingers, a comb or pick, untangle one of the pinned up sections. Start at the ends of your hair and slowly work up to the top towards the roots. If you feel the need to use a comb or pick wait as long as possible to switch from your fingers, especially if your hair is dry or damaged. When you're finished detangling twist the detangled section back up and pin back onto the scalp.
Note: When your hair is thick to very thick and has masses of curls to get through you may wish to use a detangling comb or pick with the longest teeth you can find. The longer the teeth, the easier to penetrate through the thickness of any section of hair you are detangling. Combs and picks with shorter teeth do not penetrate into thick hair as easily and may cause unnecessary tearing or pulling. 7. Remember to always use hair friendly combs or picks which means they have silky smooth teeth with the ends being tapered or rounded but not blunt. If you use your fingers be sure they do not have sharp nails or skin which will snap wet strands. You may even wish to apply cream or leave-in conditioner to your fingers to keep them silky smooth before de-tangling. 8. Once hair is completely detangled and all the detangling sections are pinned back up you can allow hair to air-dry or you can use a short or long finger diffuser or a sock. The options are endless to finishing your styling once your hair is completely detangled. If your hair actually dries out before you are finished detangling you can either spritz with a water bottle or a detangling spray. Summary
Of course there is always personal hair experiences and desires which always need to take absolute priority over what someone on a website, blog, Facebook or social networking tells you. Always be true to your own hair type, texture, condition, needs and budget. Diffuse drying hair, depending on how thick your hair is, how long and the type of texture detangling can take some time. Make sure you allow plenty of time to detangle because if you rush you risk pulling, stretching or ripping delicate strands. Depending on which curly hair expert you speak with, the type of texture you happen to have and your own hair care routine it may be best for your hair to be detangled, dried and styled using just your fingers. Social Media Network InformationPlease follow me on Twitter at: http://Twitter.com/HairBoutique. I look forward to meeting new Thank you for visiting us at The HairBoutique Blog and for leaving your comments. They are very much appreciated. We apologize in advance but must remove any direct advertisements or solicitations. Original Publication: 10/23/09 - Revised Publication: 03/08/11 | ||||||||||||||||||||||||||||||||||||||||||||||||
| If you want to talk more about this or other hair care articles on HairBoutique.com or anywhere else, please post a message on HairBoutique.com's Hair Talk Forums.
|
Please follow us on Twitter at: https://Twitter.com/HairBoutique. I look forward to meeting new people from all walks of Twitter and learning from their Tweets.

